

If the limit of public IPs that can be bound to a single CVM does not meet your needs, you can add a secondary network interface to bind multiple public IPs to achieve traffic transfer and improve CVM usage. This document introduces how to add a secondary network interface to a Linux CVM and a Windows CVM and bind multiple EIPs.
Prerequisites
- You have purchased Linux CVM and Windows CVM, and the ICMP protocol is enabled in the security group.
- Ensure that your public IP is within the limit. For specific limits, see Limits.
- Ensure that the number of private IPs bound to your secondary network interface is within the limit.
Directions
Step 1: Add secondary network interface
- Log in to the CVM console and click CVM in the left sidebar.
- In the CVM list, click your CVM ID and select ENI on the details page.
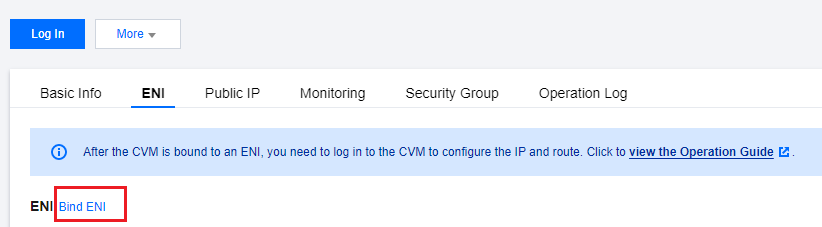
- On the ENI page, click Bind ENI.
- In the Bind ENI window that pops up, select the ENI to be bound. If you have not created an ENI, click Create and Bind an ENI, enter a name, select the subnet to which the ENI belongs, and select the allocated private IP (which can be automatically allocated or manually entered).
Note:
- If you need to allocate multiple IPs, click Add Secondary IP.
If you choose to fill in manually, make sure that the private IP you fill in is within the subnet IP range and is not a system-reserved IP.
For example, if the subnet segment is:10.0.0.0/24, the available private IP range is:10.0.0.2 - 10.0.0.254. This operation takes10.0.0.7as the primary IP and10.0.0.8as the secondary IP manually entered as an example.

Step 2: Bind EIP
- On the ENI page, click
 to expand the bound secondary network interface information.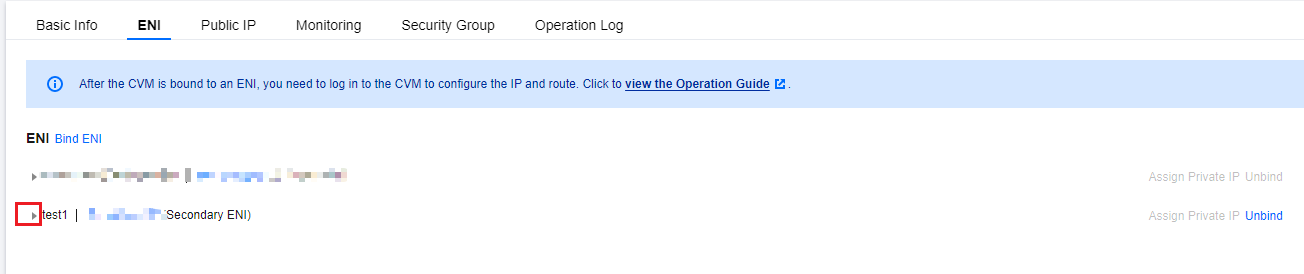
- Under the Bound EIP column of the allocated IP, click Bind to bind an EIP to the allocated IP.
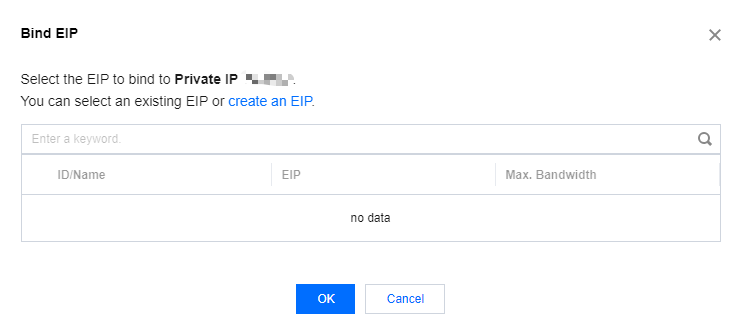
- In the Bind EIP window that pops up:
- If there is an optional EIP, select it and click OK.
- If there is no EIP available, click Create an EIP on the top of the pop-up window to apply for it. For details, see Applying for EIP. After the application is successful, return to the pop-up box and click Refresh to see the applied EIP, select it, and click OK.
- In the list of secondary network interfaces, you can view information about the binding of the private IP to the public IP.

 to expand the bound secondary network interface information.
Step 3: Configure the network interface
Select the corresponding network interface configuration operation according to the type of your CVM operating system:
Linux CVM
The following operations take CentOS 7 CVM as an example:
Log in to the CVM console and click CVM in the left sidebar.
In the instance list, click your CVM ID. On the details page, select ENI.
Click the secondary network interface ID to enter the auxiliary network interface details page, and record the following information based on the subnet to which it belongs:
- Subnet Mask: As shown in the figure below, the CIDR bit number of the subnet is /24; that is, the subnet mask is
255.255.255.0. - Gateway: If you have not changed other settings, the gateway is the first IP of the subnet range. For example, the first IP of the subnet range in the figure below is
10.0.0.1.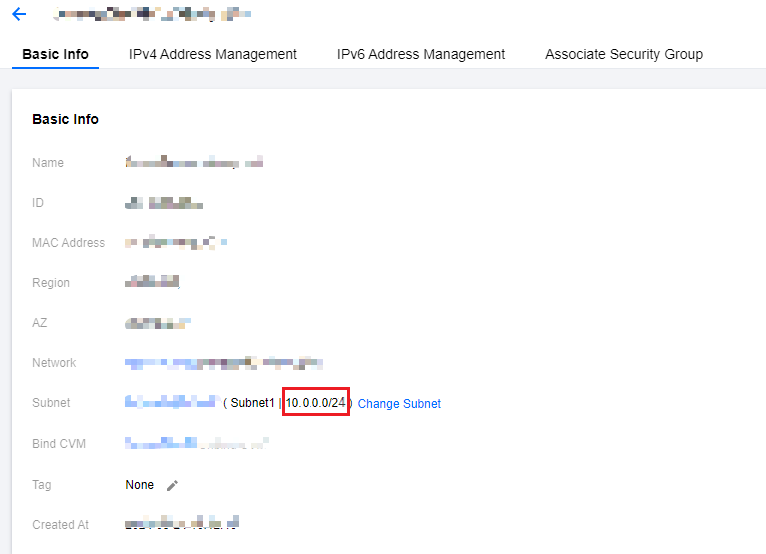
- Subnet Mask: As shown in the figure below, the CIDR bit number of the subnet is /24; that is, the subnet mask is
Log in to the CVM. For details, see Logging in to Linux Instance Using the Standard Log-in Method (Recommended).
Run the following command to copy the primary network interface file.
cp /etc/sysconfig/network-scripts/ifcfg-eth{0,1}Run the following command to open the secondary network interface configuration file.
vim /etc/sysconfig/network-scripts/ifcfg-eth1You can press i to switch to the Edit mode and modify the configuration file content to:
# Created by cloud-init on instance boot automatically, do not edit.
#
# Change this to static
BOOTPROTO=static
#
# Change this to eth1
DEVICE=eth1
# Comment this line
# HWADDR=52:54:00:8a:7a:64
# Add the following lines.
#
# Configure the primary IP.
IPADDR0=10.0.0.7 #  Manually filled primary IP in Step 1: Add secondary network interface. Fill in according to the actual situation.
NETMASK0=255.255.255.0 # The subnet mask recorded in step 3. Fill in according to the actual situation.
# Configure secondary IP 1.
IPADDR1=10.0.0.8 # Step 1: Add the secondary IP manually filled in the secondary network interface according to the actual situation.
NETMASK1=255.255.255.0 # The subnet mask recorded in step 3. Fill in according to the actual situation.
#
# Configure the gateway.
GATEWAY=10.0.0.1 # The gateway recorded in step 3. Fill in according to the actual situation.
#
NM_CONTROLLED=no
ONBOOT=yes
TYPE=Ethernet
USERCTL=no
PERSISTENT_DHCLIENT=yes
After it is modified, the example is as follows:
8. After completing the modification, press Esc , enter :wq! Press Enter to save the configuration and return.
9. Run the following command to open /etc/sysctl.conf document.
vim /etc/sysctl.conf
- Press i to switch to edit mode, make the following changes, and close
rp_filterfor verification.
# Find rp_filter on line 16 and comment on it.
# net.ipv4.conf.default.rp_filter = 1 Comment if there is one.
# Add the following 4 lines to the end of the file.
net.ipv4.conf.default.rp_filter = 0
net.ipv4.conf.all.rp_filter = 0
net.ipv4.conf.eth0.rp_filter = 0
net.ipv4.conf.eth1.rp_filter = 0
After it is modified, the example is as follows:
11. After completing the modification, press Esc , enter :wq! Press Enter to save the configuration and return.
12. Run the following command to make the configuration file take effect.
sysctl -p
- Run the following command to restart the network service:
systemctl restart network.service
- Run the following command to view the IP address:
ip address

Windows CVM
The following operations take Windows 2012 CVM as an example:
Log in to the CVM. For details, see Log in to Windows Instance Using RDP Files.
Follow the steps below to view the IP address, subnet mask, default gateway, and DNS server of the CVM's secondary network interface:
On the operating system interface, select
 in the lower left corner, click
  , open the Windows PowerShell window and run the following command:
ipconfig /allRecord the IPv4 address, subnet mask, default gateway, and DNS server values from the Ethernet Adapter Ethernet 2 information output.
Go to the operating system's Control Panel > Network and Internet > Network and Sharing Center, and click the network interface named Ethernet 2 to edit it.
In the Ethernet 2 Status pop-up window, click Attributes.
In the Ethernet 2 Attribute pop-up window, double-click Internet Protocol Version 4 (TCP/IPv4).
In the Internet Protocol Version 4 (TCP/IPv4) Attributes pop-up window, fill in the following information:
 in the lower left corner, click
  , open the Windows PowerShell window and run the following command:
| Parameter Name | Parameter Value |
|---|---|
| IP Address | The IPv4 address in the above Step 2. |
| Subnet Mask | The subnet mask in the above Step 2. |
| Default Gateway | The default gateway address in the above Step 2. |
| Preferred DNS Server | The DNS servers in the Above Step 2. |
| Backup DNS Server | The backup DNS Servers in the Above Step 2. If no backup DNS servers are listed, this parameter is not required. |
- Click Advanced and configure the secondary private IP.
- Under the pop-up window Advanced TCP/IP Settings, in the IP Address module, click Add.
- In the TCP/IP Address pop-up window, fill in the secondary private IP address configured in Step 1: Add secondary network interface and the subnet mask in Step 2, and click Add. If there are multiple secondary IPs, repeat the previous step and the current step.
- In the Internet Protocol Version 4 (TCP/IPv4) Attribute pop-up window, click OK.
- In the Ethernet 2 Attribute pop-up window, click OK to complete the configuration.
- In the Ethernet 2 Status pop-up window, click Details to view the configured IP information, as shown in the figure below.
Step 4: Result verification
Log in to another CVM and execute ping <secondary network interface public network address> command. If the following information is displayed, the binding is successful.
If the following results are not obtained after executing the command, check whether the ICMP protocol is enabled in the CVM security group configuration.