

Introduction to LVM
Logical Volume Manager (LVM) divides disks or partitions into Physical Extents (PE) units of the same size by establishing a logical layer above hard disks and partitions. Different disks or partitions can be assigned to the same volume group (VG), logical volume (LV) can be created on VG, and file systems can be created on LV.
Compared with directly using disk partitions, LVM has the strength of flexibly adjusting the capacity of file system:
- The file system is no longer limited by the size of a physical disk and can be distributed across multiple disks.
For example, you can purchase three 4-TB elastic cloud disks and use LVM to create a nearly 12-TB large file system. - You can dynamically resize your LV without having to repartition the disk.
When the space of the LVM volume group cannot meet your requirements, you can purchase an elastic cloud disk separately, attach it to the corresponding CVM, and then add it to the LVM volume group for expansion.
Building LVM
Note:
This document takes how to create a dynamically resizable file system using 3 elastic cloud disks via LVM as an example. As shown in the figure below:

Step 1: Creating a Physical Volume (PV)
Log in to the Linux CVM as root user.
Execute the following command to create a PV.
pvcreate <disk path 1> ... <Disk path N>This document takes
/dev/vdc,/dev/vdd, and/dev/vdeas examples to execute the following command:pvcreate /dev/vdc /dev/vdd /dev/vdeThe successful creation is shown in the following figure:

Execute the following command to view the PVs in the system.
lvmdiskscan | grep LVM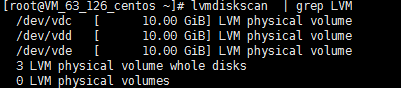
Step 2 Creating a VG
Execute the following command to create a VG.
vgcreate [-s <specified PE size>] <volume group name> <physical volume path>This document takes creating a volume group named lvm_demo0 as an example to execute the following command:
vgcreate lvm_demo0 /dev/vdc /dev/vddThe successful creation is shown in the following figure:

When the message Volume Group "" Successfully Created is prompted, the VG has been created successfully.
After the VG is created, execute the following command to add a new PV to the VG.
vgextend Volume group name New physical volume pathThe following figure shows the successful addition:

After the VG is created, you can execute
vgsandvgdisplaycommands to view the VG information in the system. As shown below:

Step 3 Creating an LV
Execute the following command to create an LV.
lvcreate [-L <logical volume size>][-n <logical volume name>] <VG name>
This document takes the creation of an 8 GB LV named lv_0 as an example to execute the following command:
lvcreate -L 8G -n lv_0 lvm_demo0
The successful creation is shown in the following figure:
Note:
Execute the
pvscommand to view that only 8 GB is used by/dev/vdcat this time. As shown below:

Step 4 Creating and Mounting the File System
Execute the following command to create a file system on the created LV.
mkfs.ext3 /dev/lvm_demo0/lv_0Execute the following command to mount the file system:
mount /dev/lvm_demo0/lv_0 vg0/The following figure shows the successful mounting:

Step 5 Dynamically Scale out the Size of LV and File System
Note:
LV capacity can be dynamically scaled out only when there is surplus VG capacity. After scaling out the LV capacity, it is necessary to scale out the size of the file system created on the LV.
Execute the following command to scale out the LV size:
lvextend [-L +/- <increase or decrease capacity>]<logical volume path>This document takes scaling out the capacity of 4 GB to LV lv_0 as an example to execute the following command:
lvextend -L +4G /dev/lvm_demo0/lv_0The following figure shows the successful scale-out:

Note:
Execute the
pvscommand to view that/dev/vdcis fully used, and/dev/vddis used 2GB. As shown below:

Execute the following command to scale out the file system:
resize2fs /dev/lvm_demo0/lv_0The following figure shows the successful scale-out:
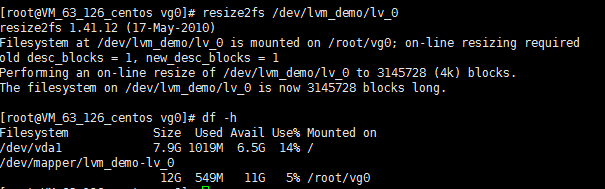
After the scale-out is successful, execute the following command to check whether the capacity of the LV has changed to 12 GB.df -h
