

Phenomenon
The file system has been created and configured for automatic attachment to the cloud disk on the Linux CVM, but after the CVM restarted, the cloud disk is not automatically attached.
Possible Causes
- Cause 1: The automatic attachment of the cloud disk is not configured in the system's
fstabconfiguration file. - Cause 2: The
fstabconfiguration file is not properly configured.
For example, if it is configured to use the device name for automatic mounting, but the device name changes when the CVM restarts, resulting in that the system cannot be started normally.
Solutions
- Solution 1 (corresponding to cause 1):
By reconfiguring the/etc/fstabfile using the following configuration methods, you can enable automatic attachment of the corresponding cloud disk after the CVM restarts.- Use the soft links from disk (recommended)
- Use universally unique identifier (UUID) of the file system
- Use the device name (not recommended)
For details, see Configuring the /etc/fstab File.
- Solution 2 (corresponding to cause 2):
Log in to the Linux CVM through VNC and enter the single-user mode. Restore the/etc/fstabconfiguration file in single-user mode, and reconfigure it. For details, see Repairing the /etc/fstab File.
Processing Procedures
Configuring the /etc/fstab File
- Log in to the Linux CVM as instructed in Using the Standard Login Method to Log In to Linux Instances (Recommended).
- Select the configuration method and obtain the corresponding information.
Using the Soft Link of the Elastic Cloud Disk (Recommended)
Configuration Mode Analysis
- Advantages: The soft link of each elastic cloud disk is fixed and unique, remaining unchanged even during operations such as unmounting and remounting, or formatting partitions.
- Disadvantages: Only elastic cloud disks have soft links, and the system cannot detect formatting operations on partitions.
Ways to Obtain Information
Execute the following command to check the soft link of elastic cloud disks.
ls -l /dev/disk/by-id
The returned result is as shown in the following figure:
Using the UUID of the File System
Configuration Mode Analysis
Automatic mount settings may be invalidated due to file system UUID changes.
For example, the UUID of a file system will change after it is reformatted.
Ways to Obtain Information
Execute the following command to check the UUID of the file system.
blkid /dev/vdb1
The returned result is as shown in the following figure:
Using the Device Name (Not Recommended)
Configuration Mode Analysis
The automatic mount setting may be invalidated due to the change of device name.
For example, when the elastic cloud disks on the CVM are unmounted and remounted during data migration, the name may change when the operating system recognizes the file system again.
Ways to Obtain Information
Execute the following command to check the device name.
fdisk -l
The returned result is as shown in the following figure:
Execute the following command to back up the
/etc/fstabfile. This document takes backup to the/homedirectory as an example:cp /etc/fstab /homeExecute the following command to open the
/etc/fstabfile with the VI editor.vi /etc/fstabPress i to enter edit mode, and enter the following configuration information on a new line at the end of the file.
<Device information> <Mount point> <File system format> <Installation options of file system> <File system dump frequency> <File system check sequence at startup>You can configure by referring to the following example according to the configuration method selected in Step 2.
Configuration example of using the soft link from elastic CBS (recommended):
/dev/disk/by-id/virtio-disk-drkhklpe-part1 /data/newpart ext4 defaults 0 2Configuration example of using UUID of file system:
UUID=d489ca1c-5057-4536-81cb-ceb2847f9954 /data/newpart ext4 defaults 0 2Configuration example of using device name (not recommended):
/dev/vdb1 /data/newpart ext4 defaults 0 2
Press Esc to enter :wq, and then press Enter to save the settings and exit the editor.
Execute the following command to check whether the
/etc/fstabfile is written successfully.mount -aIf the returned result is as shown in the following figure, the file has been written successfully. The file system is automatically mounted when the CVM starts, and you can restart the CVM for verification.

Repairing the /etc/fstab File
Log in to the CVM via VNC as instructed in Using VNC to Log in to Linux Instances.
Enter single-user mode. For details, see Setting Linux CVM to Enter Single-User Mode.
Execute the following command to back up the
/etc/fstabfile. This document takes backup to the/homedirectory as an example:cp /etc/fstab /homeExecute the following command to open the
/etc/fstabfile with the VI editor.vi /etc/fstabPress i to enter the edit mode, move the cursor to the beginning of the line with configuration error, and enter
#to configure a note for this line. As shown below:Note:
This row is configured with automatic data disk mounting, but due to incorrect configuration, the actual CVM fails to mount when it restarts.
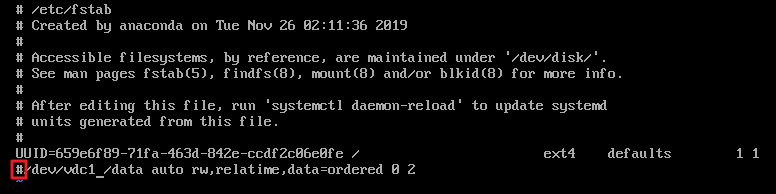
Press Esc to enter :wq, and then press Enter to save the settings and exit the editor.
Enter
exitin the command line of single-user mode to exit the single-user mode.Wait for the CVM to restart, and then log in to the CVM.
Refer to Configure /etc/fstab File and re-configure.
