

Scenarios
This document takes initializing a newly attached empty cloud disk to the CVM, creating a file system, and writing a file named test.txt to it as an example to help you understand how to simply use cloud disks. For more information on initializing cloud disks, see Initialization Scenarios.
Prerequisites
The cloud disk has been successfully attached; that is, the cloud disk is in the state of In use.
Note:
The Windows and Linux CVM operating systems used in this document are as follows:
- Windows Server 2008
- CentOS 7.5
Formatting, Creating File System and Writing Files (Windows)
Log in to the Windows instance as an administrator.
Choose CVM Management > Storage > Disk Management to enter the Disk Management interface.
(Optional) Right-click the target empty disk and select Online.
When the disk's state changes to Not Initialized, it means that the online process is complete.(Optional) Right-click the online disk and select Initialize Disk. In the pop-up window, select Master Boot Record and click OK.
Note:
The maximum disk capacity supported by the MBR (Main Boot Record) format partition is 2TB, and that supported by the GPT (GUID Partition Table) partition table is 18EB. If you need to use a disk capacity greater than 2TB, please use GPT partitioning method.
After the disk is put into use, if you switch the disk partition form, the original data on the disk will be cleared. Therefore, please select the disk partition form carefully when you initialize the disk.
Right-click the target disk and select New Simple Volume.
Input the simple volume size and click Next.
Select a drive letter or drive path and click Next. This document takes assigning drive letter E as an example.
Select the file system, format the partition, and click Next.
Click Complete.
The target disk shows as formatting. Wait a moment for the system to complete the initialization. When the volume status is Healthy, it means the disk has been successfully initialized. After successful initialization, you can see the new partition's data disk in the PC interface.Enter the newly partitioned data disk, create a new file
test.txt, input the content you need, and choose File > Save.
Formatting, Creating File System and Writing Files (Linux)
Note:
- This document uses the EXT4 file system as an example.
- After a Linux CVM is restarted or started up, the data disk will not be automatically attached. For details, see Formatting and Attaching Data Disks.
Run the following command to view the disk name connected to the instance.
fdisk -lIf information similar to what is shown below is returned, the current CVM has two disks, where
/dev/vdais the system disk and/dev/vdbis the newly added data disk.
This document uses/dev/vdbas an example for the disk name connected to the instance. As shown below: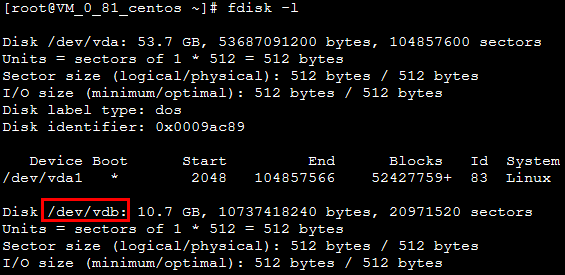
Run the following command to format this disk.
mkfs.ext4 /dev/vdbRun the following command to mount the disk to the
/datamount point.mount /dev/vdb /dataRun the following commands in sequence to enter this disk and create a new file
test.txt.cd /data vi test.txtPress i to enter the editing and input This is my first test. Press ESC to exit the editing and input :wq to save and exit the file.
Run the
lscommand, and you can see that thetest.txtfile has been written to the disk.
