

You can attach an elastic cloud disk (used as a data disk of the CVM) to any CVM in the same availability zone. Each CVM supports up to 20 data disks. You can attach a cloud disk by using the following methods:
- When starting a new CVM, specify the corresponding custom image and data disk snapshot.
After automatic attachment, there is no need to perform initialization operations such as partitioning or formatting, and read-write operations can be directly performed on the data disk. - For the cloud disks purchased separately, manually mount the elastic cloud disks to an existing CVM instance in the same availability zone through the console or API.
- After manually mounting, you'll need to perform initialization operations such as partitioning and formatting the disk. For details, see Initializing a Cloud Drive (less than 2TB) or Initializing a Cloud Drive (2TB or greater).
- Cloud disks created from snapshots
If the cloud disk capacity equals the snapshot capacity, no initialization operations such as partitioning or formatting are required after manual attachment, and read-write operations can be directly performed on the data disk.
If the cloud disk capacity is greater than the snapshot capacity, you need to extend the file system or convert the partition format.
Note:
Some Linux CVMs may fail to recognize elastic cloud disks. You can first enable the hot-swappable disk feature in the CVM. For details, see Enabling Hot-Swappable Disk Feature.
Automatic Attachment
Attaching Data Disks (Windows)
To realize automatic attachment of a cloud disk created from the corresponding data disk snapshot when starting a Windows CVM instance, the specified custom image and data disk snapshot should meet the following requirements:
- Before you create a snapshot, the data disk must be formatted into the
ntfsorfat32format. - The SAN policy in the custom image is
onlineAll.
Note:
The Windows public image currently provided has been set by default, but it is still recommended that you check this configuration before you create a custom image. The checking method is as follows: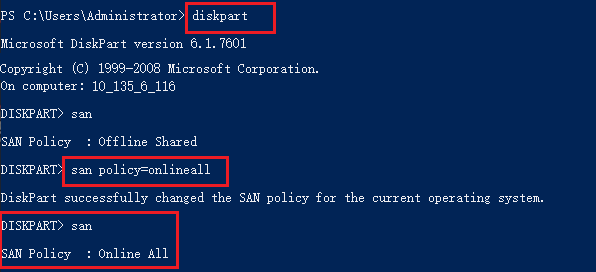
Attaching Data Disks (Linux)
To realize automatic attachment of a cloud disk created from the corresponding data disk snapshot when starting a Linux CVM instance, the specified custom image and data disk snapshot should meet the following requirements:
Before you create a snapshot, the data disk must be formatted, that is, it has been successfully mounted on the source CVM.
Before you create a custom image for the system disk, you need to add the following commands in the
/etc/rc.localfile to write the mount point of the data disk into the file.mkdir -p <mount-point> mount <device-id> <mount-point>
Note:
<mount-point>should be set to the mount point of the file system, for example/mydata.
<device-id>should be set to the actual file partition location. For example, fill in/dev/vdbwhen there is a file system but no partition, and fill in/dev/vdb1when there is a partition and a file system.
Manual Mounting
Attaching Cloud Disks Using the Console
- Log in to the CBS console.
- On the cloud disk list page, you can attach cloud disks using the following methods:
a. Click More > Attach in the row of the cloud disk in the state of To be mounted.
b. Select the cloud disks in the state of To be mounted, and click Attach above the cloud disk list to perform batch attachment. - Select the target CVM in the pop-up box, and click OK.
- Refresh the cloud disk list.
If the cloud disk's state changes to In use, it indicates that the attachment is successful. - Depending on the cloud disk's state, you need to select and perform the corresponding subsequent operations to make it available.
Creation Model Cloud Disk Capacity Subsequent Operations Creating Directly Cloud disk capacity < 2 TB Initializing Cloud Disks (<2 TB) Creating Directly Cloud disk capacity ≥ 2 TB Initializing Cloud Disks (≥ 2 TB) Creating from Snapshots Cloud disk capacity = Snapshot capacity No subsequent operation is required, and it can be used directly after it is mounted. Creating from Snapshots Snapshot capacity < Cloud disk capacity ≤ 2 TB
or
2 TB < Snapshot capacity < Cloud disk capacity- Mount to Windows CVM: scale out the partition and file system (Windows)
- Mount to Linux CVM: scale out the partition and file system (Linux)Creating from Snapshots Snapshot capacity ≤ 2 TB < Cloud disk capacity If MBR partition is used in the snapshot:
See Initializing Cloud Disks (≥ 2 TB) for repartition using GPT. This operation will delete existing data.
If the GPT partition is used in the snapshot:
- Mount to Windows CVM: scale out the partition and file system (Windows)
- Mount to Linux CVM: scale out the partition and file system (Linux)
Attaching Cloud Disks Using the API
You can use the AttachDisks API to create a snapshot. For details, see API Documentation > AttachDisks.
Enabling the Disk Hot Swapping Feature
All currently provided images support attaching and detaching elastic cloud disks. Before detaching a cloud disk, you need to performumount(Linux) or offline (Windows) operations. Otherwise, the CVM may fail to recognize the elastic cloud disk when it is attached again.
However, if you have purchased a CVM with the following operating systems before and plan to attach an elastic cloud disk to it, it is recommended that you first add the relevant driver to the CVM to enable the hot-plug feature.
Log in to the Linux CVM as root user.
Execute the following command to add a driver.
modprobe acpiphp(Optional) According to different operating systems, select the corresponding operation method to set the
acpiphpmodule as automatically load upon startup:Centos5 series
Execute the following command to create and open the
acpiphp.modulesfile.vi /etc/sysconfig/modules/acpiphp.modulesAdd the following to the file and save it.
#!/bin/bash
modprobe acpiphp >& /dev/null
Execute the following command to add the executable permission.
chmod a+x /etc/sysconfig/modules/acpiphp.modules
Debian 6 series, Ubuntu 10.04 series
Execute the following command to modify the file.
vi /etc/modulesAdd the following to the file and save it.
acpiphp
openSUSE 12.3 series
Execute the following command to modify the file.
vi /etc/sysconfig/kernelAdd the following to the file and save it.
MODULES_LOADED_ON_BOOT="acpiphp"