

Scenarios
A cloud disk is an expandable cloud storage device. You can expand its capacity at any time after it is created to increase storage space without losing existing data on the cloud disk.
After the cloud disk capacity is expanded, you need to allocate the expanded capacity to an existing partition or format the expanded capacity into a new independent partition.
Prerequisites
Note:
Inadvertently scaling-out the file system may affect existing data, so it is strongly recommended that you manually create a snapshot to back up data before operation.
- The cloud disk capacity has been expanded.
- The cloud disk has been attached to a Linux CVM, and a file system has been created.
- You have logged in to the Linux CVM of the partition and file system to be scaled out.
Operation Steps
Confirming Scale-Out Mode
Execute the following commands as the root user to query the partition format used by the cloud disk.
fdisk -lIf the device displayed in the results has no partition (for example, only /dev/vdb is displayed), see Expanding File System.
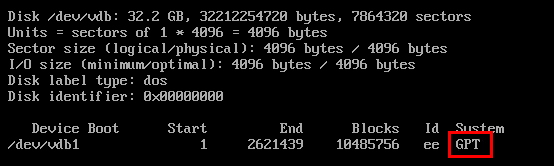
If the results are shown in the following two figures (slightly different depending on the operating system), a GPT partition is used.

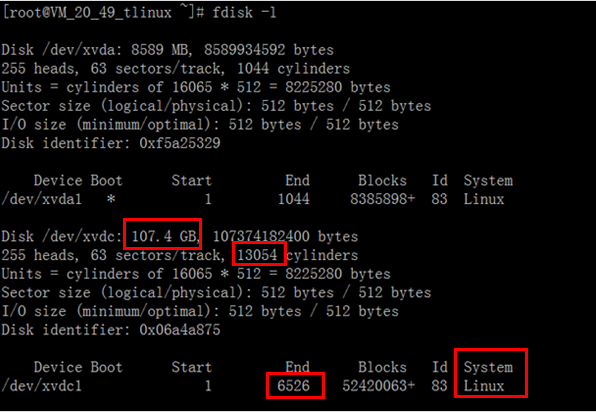
If the results are shown in the following figures (slightly different depending on the operating system), an MBR partition is used.
Note:
The maximum disk capacity supported by the MBR partition is 2 TB. If your hard disk partition is in an MBR format and needs to be scaled out to exceed 2 TB, it is recommended that you create and mount a new data disk, use the GPT partition method, and copy the data to the new disk. For the Linux operating system, when GPT is selected as the disk partition form, the fdisk partition tool will not be available, and the parted tool needs to be used.
Based on the cloud disk partition format queried in step 1, select the corresponding operation guide.
Partition Form Operation Guide Description - Scaling out File System It is applicable to the scene where no partition is created, and a file system is directly created on a raw device. GPT Allocating the Capacity of the Scaled-Out Part to the Original Partition (GPT) It also applies to unpartitioned direct formatting scenes. GPT Formatting the Capacity of the Scaled-Out Part into a Separate New Partition (GPT) The original partition can be kept unchanged. MBR Allocating the Capacity of the Scaled-Out Part to the Original Partition (MBR) It also applies to unpartitioned direct formatting scenes. MBR Formatting the Capacity of the Scaled-Out Part into a Separate New Partition (MBR) The original partition can be kept unchanged.
Scaling Out File System
Depending on the file system type, execute different commands to scale out.
- For the EXT file system, execute the
resize2fscommand to scale-out. - For the XFS file system, execute the
xfs_growfscommand to scale-out.
Take/dev/vdbas an example. The EXT file system executes the following command:
resize2fs /dev/vdbTake
/dev/vdbas an example. The XFS file system executes the following command:xfs_growfs /dev/vdb- For the EXT file system, execute the
Execute the following command to view the new partition.
df -h
Allocating the Capacity of the Scaled-Out Part to the Original Partition (GPT)
Execute the following command as the root user to confirm the capacity change of the cloud disk.
parted <disk_path> printThis document takes the disk path of
/dev/vdbas an example to execute the following command:parted /dev/vdb printIf the following information is displayed in the process, input
Fix.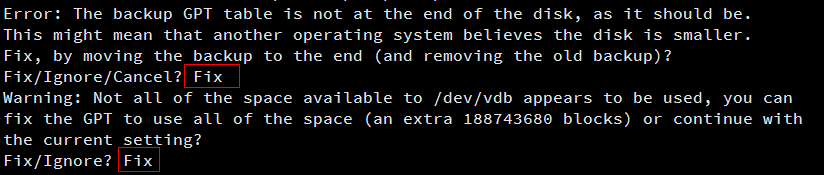
As shown in the figure below, the expanded cloud disk size is 107 GB, and the existing partition size is 10.7 GB.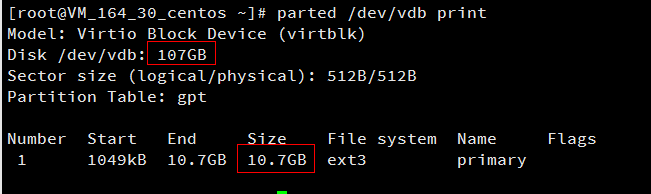
Execute the command to confirm whether any partitions on this cloud disk are still attached.
mount | grep '<disk_path>'This document takes the disk path of
/dev/vdbas an example to execute the following command:mount | grep '/dev/vdb'As shown in the figure below, one partition (vdb1) on the cloud disk is attached to
/data.
Execute the following command to unmount the data disk:
umount <mount_point>This document takes the mount point of
/dataas an example to execute the following command:umount /dataNote:
Detach the file systems of all partitions on the cloud disk, and then execute the operations in step 4. Repeat the following command to confirm that the file systems of all partitions on the hard disk have been detached.
mount | grep '/dev/vdb'File systems of all partitions on the cloud disk have been detached. As shown in the figure below:

Execute the following command to go to the parted partition tool:
parted '<disk_path>'This document takes the disk path of
/dev/vdbas an example to execute the following command:parted '/dev/vdb'Execute the following command to change the display and manipulation units to sector (GB by default).
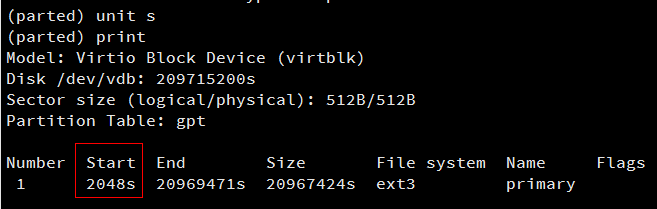
unit sExecute the following command to view partition information and record the Start value of existing partitions.
Note:
After the partition is deleted and created, the Start value must remain unchanged; otherwise, data loss will occur.
printThe Start value in this document is 2,048s. As shown below:
Execute the following command to delete the partition.
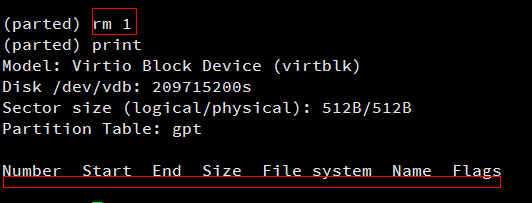
rm <partition_number>For example, as shown in the figure above, there is one partition on the cloud disk with the Number as 1, so execute the command:
rm 1The output is shown in the following figure.
Execute the following command to create a new primary partition:
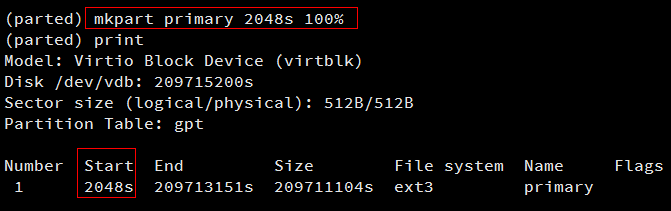
mkpart primary <original_partition_originate_sector> 100%Among them, 100% means that this partition reaches the end of the disk.
For example, if the primary partition starts from the 2,048th sector (which must be consistent with that before deletion, i.e., the Start value is 2,048s), execute the following command:mkpart primary 2048s 100%If the status shown in the following figure is displayed, input
Ignore.
Execute the following command to check whether a new partition has been created.
printThe return result is shown in the following figure, indicating that the new partition has been created successfully.
Execute the following command to exit the parted tool:
quit
- Execute the following command to check the partitions after scale out:
e2fsck -f <partition_path>
This document takes the new partition of 1 (i.e., the partition path is /dev/vdb1) as an example to execute the following command:
e2fsck -f /dev/vdb1
The results shown in the following figure are returned.

- Execute the following command to scale out the EXT file system on the new partition.
resize2fs <partition_path>
This document takes the partition path of /dev/vdb1 as an example to execute the following command:
resize2fs /dev/vdb1
The following figure shows the successful scale-out:

- Execute the following command to scale out the XFS file system on the new partition.
xfs_growfs <partition_path>
This document takes the partition path of /dev/vdb1 as an example to execute the following command:
xfs_growfs /dev/vdb1
- Execute the following command to manually mount the new partition:
mount <partition_path> <mount_point>
This document takes the partition path of /dev/vdb1 and the mount point of /data as an example to execute the following command:
mount /dev/vdb1 /data
- Execute the following command to view the new partition.
df -h
If the following information is returned, the mounting is successful, and the data disk can be viewed.

Formatting the Capacity of the Scaled-Out Part into a Separate New Partition (GPT)
Execute the following command as the root user to confirm the capacity change of the cloud disk.
parted <disk_path> printThis document takes the disk path of
/dev/vdbas an example to execute the following command:parted /dev/vdb printIf the following information is prompted in the process, input
Fix.
As shown in the figure below, the expanded cloud disk size is 107 GB, and the existing partition size is 10.7 GB.Execute the command to confirm whether any partitions on this cloud disk are still attached.
mount | grep '<disk_path>'This document takes the disk path of
/dev/vdbas an example to execute the following command:mount | grep '/dev/vdb'As shown in the figure below, one partition (vdb1) on the cloud disk is attached to
/data.Execute the following command to unmount the data disk:
umount <mount_point>This document takes the mount point of
/dataas an example to execute the following command:umount /dataNote:
Detach the file systems of all partitions on the cloud disk, and then execute the operations in step 4. Repeat the following command to confirm that the file systems of all partitions on the hard disk have been detached.
mount | grep '/dev/vdb'File systems of all partitions on the cloud disk have been detached. As shown in the figure below:

Execute the following command to go to the parted partition tool:
parted '<disk_path>'This document takes the disk path of
/dev/vdbas an example to execute the following command:parted '/dev/vdb'Execute the following command to view the partition information and record the End value of the existing partition, which is used as the start offset value of the next partition.
print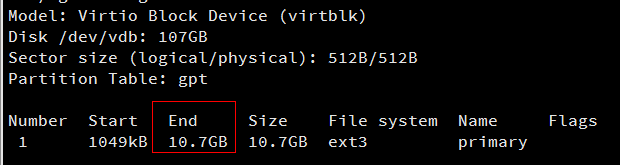
Execute the following command to create a new primary partition: This partition will start at the end of an existing partition and cover all new space on your hard disk.
mkpart primary start endThis document takes the End value of 10.7 GB as an example to execute the following command:
mkpart primary 10.7GB 100%Execute the following command to check whether a new partition has been created.
print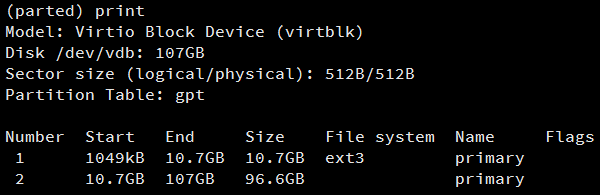
Execute the following command to exit the parted tool:
quitExecute the following command to format the new partition:
mkfs.<fstype> <partition_path>You can choose the file system format yourself, such as EXT2 or EXT3.
This document takes the EXT3 file system as an example, so execute the command:
mkfs.ext3 /dev/vdb2
Allocating the Capacity of the Scaled-Out Part to the Original Partition (MBR)
The fdisk/e2fsck/resize2fs automatic expansion tool applies to Linux operating systems and is used to add the expanded cloud disk space to the existing file system. For the expansion to succeed, the following four conditions should be met:
- The file system is EXT2/EXT3/EXT4/XFS.
- The current file system cannot contain errors.
- The disk size after scale-out must not exceed 2 TB.
- The current tool only supports the Python 2 version and does not support the Python 3 version.
Execute the following command as user root to unmount the partition.
umount <mount_point>This document takes the mount point of
/dataas an example to execute the following command:umount /data
Open the browser, enter
//imgcache.convergecloud.com/tcloud/cbs/devresize.pyto download the tool script, and place it in the/tmpdirectory of the machine to be scaled out.Execute the following command to scale out using the scale out tool:
python /tmp/devresize.py <hard_disk_path>This document takes the hard disk path of
/dev/vdb, and the file system is on vdb1 as an example to execute the following command:python /tmp/devresize.py /dev/vdb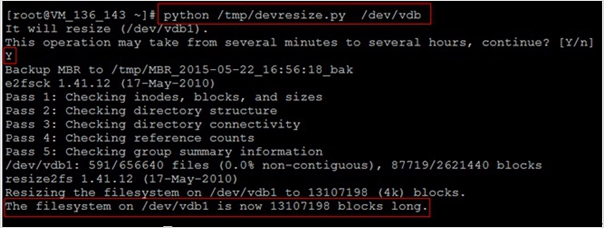
- If the output The filesystem on /dev/vdb1 is now XXXXX blocks long. is displayed, the scale-out succeeds. In this case, perform step 4.
- If the output is [ERROR]-e2fsck failed!!, perform the following steps:
Execute the following command to restore the partition where the file system is located:
fsck -a <partition_path>This document takes the hard disk path of
/dev/vdb, and the file system is on vdb1 as an example to execute the following command:fsck -a /dev/vdb1After repairing successfully, execute the following command again to scale-out using the scale-out tool.
python /tmp/devresize.py /dev/vdb
Execute the following command to manually mount the scaled-out partition:
mount <partition_path> <mount_point>This document takes the mount point of
/dataas an example.If there are partitions before the scaling-out and the partition path of
/dev/vdb1is taken as an example, execute the following command:mount /dev/vdb1 /dataIf there is no partition before scaling out, execute the following command:
mount /dev/vdb /data
Execute the following command to view the partition capacity after scaling out:
df -hIf information similar to that shown in the following figure is returned, the mounting is successful, and the data disk can be viewed:
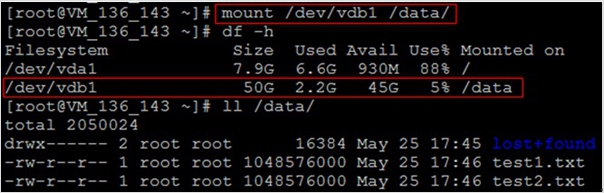
Execute the following command to view the data information of the original partition after scaling out and check whether the newly added storage space is scaled out in the file system.
ll /data
Formatting the Capacity of the Scaled-Out Part into a Separate New Partition (MBR)
Execute the following commands as user root to view the partition information of the mounted data disk.
df -h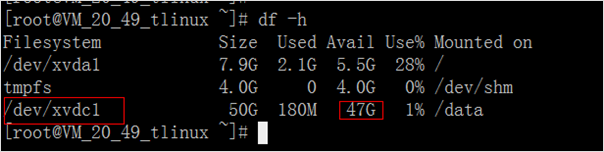
Execute the following command to view information about unpartitioned data disks after scaling out:
fdisk -l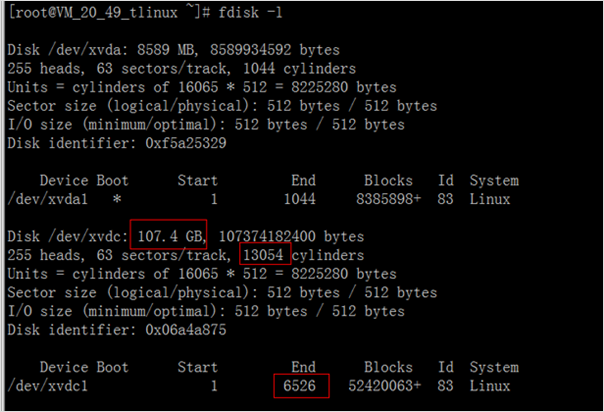
Execute the following command to unmount all mounted partitions.
umount <mount_point>This document takes the mount point of
/dataas an example to execute the following command:umount /dataNote:
Detach all partitions on the cloud disk, and then execute step 4.
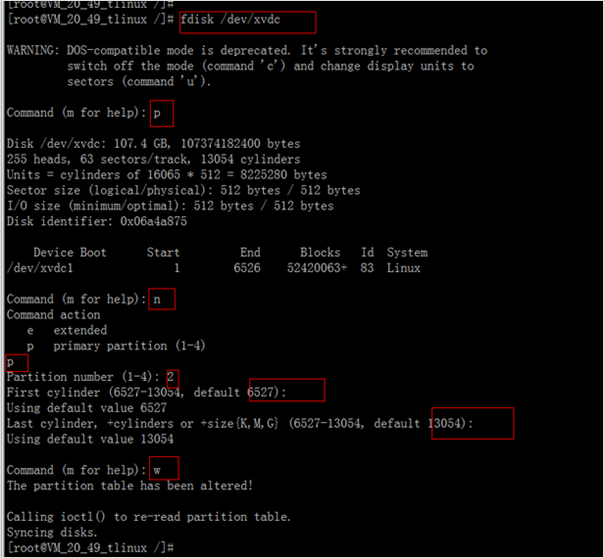
Execute the following command to create a new partition.
fdisk <hard_disk_path>This document takes the disk path of
/dev/xvdcas an example to execute the following command:fdisk /dev/xvdcAccording to the prompts on the interface, sequentially input p (to view existing partition information), n (to create partition), p (to create primary partition), and 2 (to create a second primary partition), press Enter twice (to use default configuration), and input w (to save partition table) to start partition. As shown in the figure below:
Note:
This document takes the creation of one partition as an example. You can also create multiple partitions according to your actual needs.
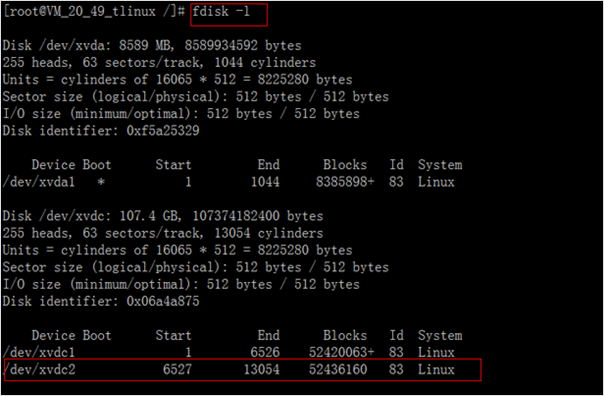
Execute the following command to view the new partition.
fdisk -lThe following figure indicates that a new partition xvdc2 has been created.
Execute the following commands to format the new partition and create a file system.
mkfs.<fstype> <partition_path>You can choose the format of your file system, such as EXT2 and EXT3.
This document takes the file system of EXT3 as an example to execute the following command:mkfs.ext3 /dev/xvdc2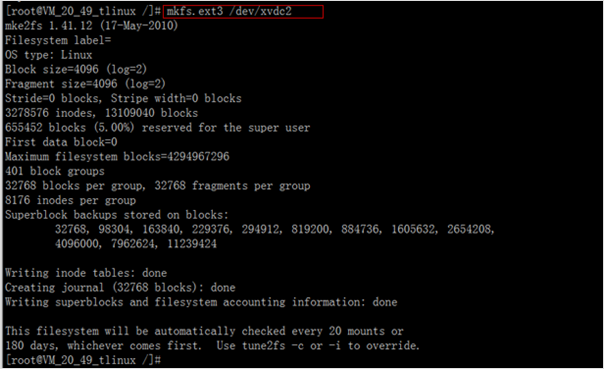
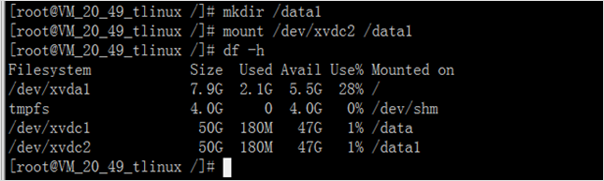
Execute the following command to create a new mount point.
mkdir <new_mount_point>This document takes the new mount point of
/data1as an example to execute the following command:mkdir /data1Execute the following command to manually mount the new partition:
mount <new_partition_path> <new_mount_point>This document takes the new partition path of
/dev/xvdc2and the new mount point of/data1as an example to execute the following command:mount /dev/xvdc2 /data1Execute the following command to view information about the new partition:
df -hIf the following information is returned, the mounting is successful, and the data disk can be viewed.
Note:
If you want the CVM to automatically mount on the data disk when it is restarted or started, you need to perform step 10 and step 11 to add new partition information to
/etc/fstab.
Execute the following command to add a message.
echo '/dev/xvdc2 /data1 ext3 defaults 0 0' >> /etc/fstab
- Execute the following command to view the message:
cat /etc/fstab
If the information shown in the following figure is returned, the partition information has been added successfully.
