

Scenarios
This document takes the capacity of cloud disks less than 2 TB as an example to guide the initialization of cloud disks. For more information about the disk initialization scenario, please see Initialization Scenarios.
Prerequisites
Note:
- Formatting the data disk will empty all data. Make sure that the disk does not contain data or important data has been backed up.
- To prevent service exceptions, ensure that the CVM has stopped providing external services before formatting.
The cloud disk has been attached to a CVM.
Operation Steps
Initializing Cloud Disks (Windows)
Note:
This document takes the Windows Server 2008 operating system as an example. Different operating systems may have different formatting operations, so this document is for reference only.
Log in to the Windows CVM instance.
Click Start on the CVM desktop.
Right-click Computer in the Start menu, and select Manage.
In the left sidebar, choose Storage > Disk Management to enter the disk management page.
Note:
If the new disk is offline, you need to perform step 5 to bring it online before performing step 6 for initialization. Otherwise, directly perform step 6 for initialization.
The disk list appears in the right pane. Right-click the Disk 1 area, and select Online in the menu list to connect. After online, disk 1 changes from offline to Not initialized.
Right-click the disk 1 area and select Initialize Disk in the menu list.
Display the disk to be initialized in the initialize disk dialog box, select MBR or GPT, and click OK.
Note:
After a disk is put into use, switching the disk partition scheme will result in the deletion of all existing data on the disk. Therefore, please select the appropriate partition scheme based on your actual needs.
Right-click an unallocated region on the disk and select New Simple Volume.
The Create simple volume wizard dialog box is displayed. Click Next as prompted on the page.
Specify the volume size according to the actual situation. The default is the maximum value, and click Next.
Assign a drive number and click Next.
Select Format this volume with the following settings, set parameters according to the actual situation, format the new partition, and click Next to complete the partition creation.
Click Complete to finish the wizard. You need to wait a moment for the system to complete initialization. When the volume status is Healthy, it means that the disk has been successfully initialized.
After successful initialization, enter the computer interface to check the new disk.
Initializing Cloud Disks (Linux)
Select the initialization method according to your actual use cases:
- If the entire hard disk is only presented as an independent partition (i.e., there are no multiple logical disks such as vdb1 and vdb2), it is highly recommended that you do not use a partition and directly Creating file systems on bare devices.
- If the entire hard disk needs to be presented as multiple logical partitions (that is, there are multiple logical disks), you need to partition it first, and then build a file system on the partitions.
Creating File Systems on Bare Devices
Log in to the Linux CVM.
Execute the following command as root user to check the disk name.
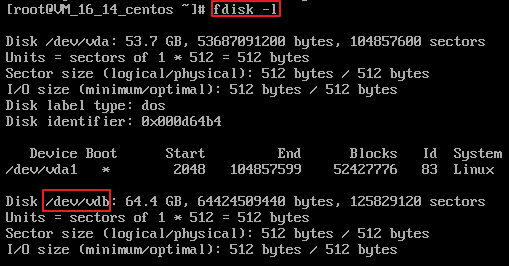
fdisk -lIf information similar to what is shown below is returned, the current CVM has two disks, in which /dev/vda is the system disk and /dev/vdb is the newly added data disk.
Execute the following command to create a file system on the /dev/vdb bare device.
mkfs -t <File system format> /dev/vdbThe partition size supported by different file systems varies. Select an appropriate file system as needed. Take setting the file system to
EXT4as an example:mkfs -t ext4 /dev/vdb
Note:
Formatting takes some time. Observe the system's running status and do not exit.
Execute the following command to create a new mount point.
mkdir <Mount point>Take creating a new mount point
/dataas an example:mkdir /dataExecute the following command to mount the new partition to the newly created mount point.
mount /dev/vdb <Mount point>Take creating a new mount point
/dataas an example:mount /dev/vdb /dataExecute the following command to check the mounting result.
df -THNote:
If there is no need to set automatic disk mounting at startup, you can skip the subsequent steps.
Confirm the mounting mode and obtain corresponding information.
You can use the soft link of elastic cloud disks, the UUID (universally unique identifier) of the file system, or the device name to mount the disk automatically according to business requirements. The relevant instructions and ways of obtaining information are as follows:
| Mounting Mode | Advantages and Disadvantages | Ways to Obtain Information |
|---|---|---|
| Using a Soft Link from an Elastic Cloud Disk (Recommended) | Advantages: The soft link of each elastic cloud disk is fixed and unique, remaining unchanged even during operations such as unmounting and remounting, or formatting partitions. Disadvantages: Only elastic cloud disks has soft link. Elastic cloud disks do not recognize or detect partition formatting operations. |
Execute the following command to check the soft link of elastic cloud disks.ls -l /dev/disk/by-id |
| Using the UUID of the File System | Automatic mount settings may be invalidated due to file system UUID changes. For example, the UUID of a file system will change after it is reformatted. |
Execute the following command to check the UUID of the file system.blkid /dev/vdb |
| Using the Name of Devices | The automatic mount setting may be invalidated due to the change of device name. For example, when the elastic cloud disks on the CVM are unmounted and remounted during data migration, the name may change when the operating system recognizes the file system again. |
Execute the following command to check the device name.fdisk -l |
Execute the following command to back up the
/etc/fstabfile. Take backup to the /home directory as an example:cp -r /etc/fstab /homeExecute the following command to open the
/etc/fstabfile with the VI editor.vi /etc/fstabPress i to enter the edit mode.
Move the cursor to the end of the file, press Enter and add the following content.
<Device information> <Mount point> <File system format> <Installation options of file system> <File system dump frequency> <File system check sequence at startup>
(Recommended) Take automatic mounting by the soft link from elastic cloud disks as an example. Based on the previous examples, the following is added:
/dev/disk/by-id/virtio-disk-drkhklpe /data ext4 defaults 0 0Take automatic mounting by the disk partition's UUID as an example. Based on the previous examples, the following is added:
UUID=d489ca1c-5057-4536-81cb-ceb2847f9954 /data ext4 defaults 0 0Take automatic mounting using the name of devices as an example. Based on the previous examples, the following is added:
/dev/vdb /data ext4 defaults 0 0
Press Esc, enter :wq, and press Enter.
Save the settings and exit the editor.Execute the following command to check whether the /etc/fstab file is written successfully.
mount -a
If the operation succeeds, it means that the file is written successfully, and the newly created file system will be automatically mounted when the operating system starts.
Creating a File System on the Partition
Note:
This document uses the fdisk partition tool in the CentOS 7.5 operating system to configure the
/dev/vdcdata disk as the primary partition. MBR is used as the default partition format, EXT4 format as the file system, and/data/newpartas the mount point. Disk automount at startup is configured. Note that the formatting operation may vary according to the operating system.
Log in to the Linux CVM.
Execute the following command as root user to check the disk name.
fdisk -lIf information similar to what is shown below is returned, the current CVM has two disks, in which /dev/vda is the system disk and /dev/vdb is the newly added data disk.
Execute the following command to enter the fdisk partition tool and start partitioning the new data disk.
fdisk <Create data disk>Take the newly mounted data disk
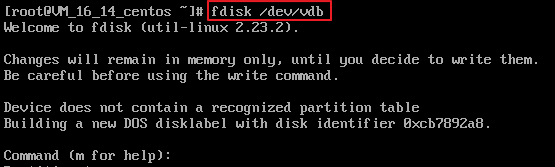
/dev/vdbas an example:fdisk /dev/vdbThe output is similar to the following figure:
Enter
nand press Enter to create a new partition.
The output is similar to the following figure:
Indicates that the disk has two partition types:- P indicates the main partition.
- E indicates the extended partition.
Take the creation of a primary partition as an example. Enter
pand press Enter to start creating a primary partition.
The output is similar to the following figure:
Partition number indicates the main partition number, ranging from 1 to 4.Take the selection of partition number 1 as an example, enter the main partition number
1and press Enter.
The output is similar to the following figure:
First sector indicates the initial magnetic column area. You can select 2048 - 20971519, and the default is 2048.Take the selection of the default initial cylinder number 2048 as an example, press Enter.
The output is similar to the following figure:
Last sector indicates the cut-off magnetic cylinder area. You can select 2048-20971519, and the default is 20971519.Take the selection of default cut-off cylinder number 20971519 as an example, press Enter.
The output is similar to the following figure:
Indicates that the partition is completed, i.e. a new partition has been created for the 60 GB data disk.Enter
pand press Enter to check the details of the new partition.
The output is similar to the following figure: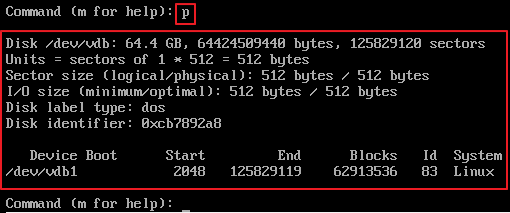
It indicates the details of the new partition/dev/vdb1.Note:
If the above partition operation is incorrect, please enter
qto exit the fdisk partition tool. The previous partition results will not be retained.Enter
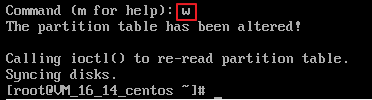
wand press Enter to write the partition results into the partition table.
The output is similar to that shown in the following figure, indicating that the partition has been created.
Execute the following command to synchronize new partition table changes to the operating system.
partprobe
- Execute the following command to set the file system of the new partition in the format required by the system.
mkfs -t <File system format> /dev/vdb1
The partition size supported by different file systems varies. Select an appropriate file system as needed. Take setting the file system as EXT4 as an example:
mkfs -t ext4 /dev/vdb1
The output is similar to the following figure:

Formatting takes some time. Observe the system's running status and do not exit.
- Execute the following command to create a new mount point.
mkdir <Mount point>
Take the new mount point /data/newpart as an example:
mkdir /data/newpart
- Execute the following command to mount the new partition to the newly created mount point.
mount /dev/vdb1 <Mount point>
Take the new mount point /data/newpart as an example:
mount /dev/vdb1 /data/newpart
- Execute the following command to check the mounting result.
df -TH
The output is similar to the following figure:

It indicates that the new partition /dev/vdb1 has been mounted to /data/newpart.
Note:
If there is no need to set automatic disk mounting at startup, you can skip the subsequent steps.
Confirm the mounting mode and obtain corresponding information.
You can use the soft link of elastic cloud disks, the UUID (universally unique identifier) of the file system, or the device name to mount the disk automatically according to business requirements. The relevant instructions and ways of obtaining information are as follows:Mounting Mode Advantages and Disadvantages Ways to Obtain Information Using a soft link from an elastic cloud disks (recommended) Advantages: The soft link of each elastic cloud disk is fixed and unique, remaining unchanged even during operations such as unmounting and remounting, or formatting partitions.
Disadvantages: Only elastic cloud disks has soft link. Elastic cloud disks do not recognize or detect partition formatting operations.Execute the following command to check the soft link of elastic cloud disks. ls -l /dev/disk/by-idUsing the UUID of the File System Automatic mount settings may be invalidated due to file system UUID changes.
For example, the UUID of a file system will change after it is reformatted.Execute the following command to check the UUID of the file system. blkid /dev/vdb1Using the Name of Devices The automatic mount setting may be invalidated due to the change of device name.
For example, when the elastic cloud disks on the CVM are unmounted and remounted during data migration, the name may change when the operating system recognizes the file system again.Execute the following command to check the device name. fdisk -lExecute the following command to back up the
/etc/fstab file. Take backup to the /home directory as an example:
cp -r /etc/fstab /home
- Execute the following command to open the
/etc/fstabfile with the VI editor.
vi /etc/fstab
- Press i to enter the edit mode.
- Move the cursor to the end of the file, press Enter and add the following content.
<Device information> <Mount point> <File system format> <Installation options of file system> <File system dump frequency> <File system check sequence at startup>
(Recommended) Take automatic mounting by the soft link from elastic cloud disks as an example. Based on the previous examples, the following is added:
/dev/disk/by-id/virtio-disk-drkhklpe-part1 /data/newpart ext4 defaults 0 2Take automatic mounting by the disk partition's UUID as an example. Based on the previous examples, the following is added:
UUID=d489ca1c-5057-4536-81cb-ceb2847f9954 /data/newpart ext4 defaults 0 2Take automatic mounting using the name of devices as an example. Based on the previous examples, the following is added:
/dev/vdb1 /data/newpart ext4 defaults 0 2
Press Esc, enter :wq, and press Enter.
Save the settings and exit the editor.Execute the following command to check whether the
/etc/fstabfile is written successfully.
mount -a
If the operation succeeds, it means that the file is written successfully, and the newly created file system will be automatically mounted when the operating system starts.