

This document describes how to quickly create a Private Link service and share the cloud services deployed in your VPC with VPCs of other accounts.
Background
You can use the Private Link service to establish a secure and stable access connection between VPCs, simplifying the network architecture and avoiding potential security risks associated with public internet access. With Private Link, you can establish secure and stable private connections between VPCs and cloud services, simplifying network architecture and avoiding potential security risks associated with accessing services via the public network.
To establish a connection using Private Link, you need to create both an endpoint service and an endpoint. Before creating the endpoint service, you need to create a private network Layer 4 CLB instance and create a listener associated with the Cloud Virtual Machine instance that has the deployed service. Then, when creating the endpoint service, associate it with the CLB instance. At this point, the endpoint service will serve as the business access entry for the service provider, available for the service user's created endpoint to request a connection. Once the connection is successfully established, the service user can access the service provider's deployed services.
Scenario Example
In this example business scenario, assume the business is deployed in VPC2. Now, the business needs to be shared for access by another account's VPC. To avoid potential security risks from public network access, use Private Link to achieve a secure intranet access solution from VPC1 to VPC2.
Prerequisites
- The service user shall inform the service provider of the UIN account. After the service user initiates a connection request, it can be connected only after the service provider accepts the request.
- In the service provider's VPC2, a private network Layer 4 CLB instance has already been created, and related service resources are deployed in the backend Cloud Virtual Machine instance. Ensure that the backend Cloud Virtual Machine instance can properly process requests forwarded by Cloud Load Balancer.
- The service provider shall inform the service user of VPORT for Cloud Load Balancer in advance.
Directions
Step 1: The service provider creates an endpoint service
- log in to the Endpoint Service Console.
- Click Create.
- In the pop-up Create Endpoint Service interface, configure the relevant parameters.
Parameter description:
- Service name: custom the name of endpoint service.
- Region: The region of the endpoint service node.
- Network: Select the associated VPC.
- CLB: Select the CLB created under the VPC.
- Auto Accept: Specifies whether the endpoint service automatically accepts connection requests initiated by the endpoint, with the default set to No. This document will maintain the default.
- If it is the same account, then Auto Accept is available.
- If it is a cross-account, when select Auto Accept and the endpoint is in the user allowlist, then the endpoint is available upon successful creation.
- If it is cross-account and Auto Accept is not selected, the initial status of the successfully created endpoint is Pending Acceptance, and it needs to be accepted by the server-side to become available.
- After completing the parameter settings, click OK to complete the creation of the endpoint service.
Step 2: add service consumer account allowlist
- Click the ID of the created endpoint service to enter its details page.
- click Allowlist tab to enter the User Allowlist Management interface.
- Click [Add] to enter the [Add Allowlist Users] interface.
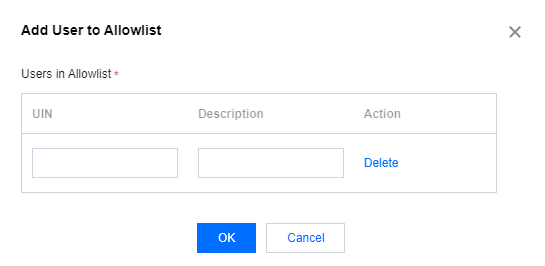
- Enter the user UIN and user description. If multiple users need to be added, click Add.
- After completing the user allowlist addition, click OK. The successfully added allowlist will be displayed in the list.
Step 3: The service user creates an endpoint
- Log in to the Endpoint Console.
- Click [Create] to enter the [Create Terminal Endpoint] interface.
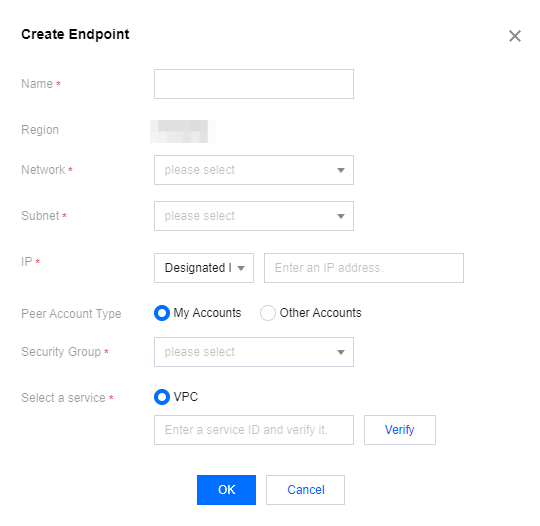
Configure parameters of the endpoint.- Name: custom the name of the endpoint.
- Region: The region where the endpoint is located.
- Network: Select the VPC where the endpoint is located.
- Subnet: Select the subnet where the endpoint is located.
- IP address: the IP address of the endpoint. You can specify an IP address, which should be a private IP address within the VPC, or opt for automatic IP assignment.
- Peer account type: Select the owning account of the VPC that needs access. My Account indicates access within the same account VPC, while Other Accounts signifies cross-account VPC access. For cross-account access, it is necessary to inform the peer account of your account number, and after initiating a connection request, server-side acceptance is required for connectivity.
- Select service: Enter the ID of the endpoint service and click Verify. Only services that have passed verification can be connected.
- After the parameter settings are completed, click OK.
Step 4: (optional) bind security groups
Bind a security group to the endpoint to control the inbound traffic, and improve the security of business access.
- Log in to the Security Group Console, create a security group and set its rules.
- In the Security Group tab interface of the Endpoint Details page, you can bind a security group to the endpoint.
Step 5: manage endpoint connection requests
For cross-account, the service provider needs to accept the connection requests initiated by the user to establish a connection.
- Click the ID of the created endpoint service to enter its details page.
- Click the Endpoint Connection tab to enter the Endpoint Connection Management interface.
- Handle the connection request status of the endpoint according to the actual situation. In this example, Acceptance is selected.
Endpoint connections have three statuses: pending acceptance, available, and denied.
- For connections in the Denied state, you can perform the Acceptance operation. After execution, the status becomes Available.
- For connections in the Available state, you can perform the Deny operation. After execution, the status becomes Denied.
- For connection requests in the Pending Acceptance state, you can perform Acceptance or Deny, and after execution, the status becomes Available or Denied, respectively.
Note: The endpoint service can be connected by multiple endpoint. The status of the endpoint service refers to the status of each connection, not the status of the endpoint service alone.
Step 6: The service user initiates an access request for connection verification
- Log in to a CVM under service user VPC1 and access the service provider's backend service through VIP+VPORT.
- In this example, use telnet to verify connectivity by executing telnet VIP VPORT.
Note: If the server does not have telnet installed, please install telnet first by executing yum install telnet.
If the following information appears, it indicates a connection:
