

Network probing is a service for monitoring the quality of VPC network connection, which can monitor key metrics such as the latency and packet loss rate of the network connection for you.
In a hybrid cloud network architecture, you will use VPN/dedicated line to connect the cloud VPC and your own IDC. In order to monitor the network quality of the connection in real time, you can create a network probing object in the subnet that needs to communicate with the IDC. After the probing object is created, the packet loss rate and latency of the probed link will be returned, helping you achieve the following features:
- Real-time monitoring of connection quality.
- Real-time alerts for connection failures.
Usage Instructions
- Network probing is Ping probing with a frequency of 20 times per minute.
- Up to 50 network probing instances can be created within each VPC.
- Network probing can be created for up to 20 subnets under the same VPC.
Create Network Probing
Log in to the VPC console.
In the left menu, click Network Probing.
At the top of the management console, click Create.
In the Create Network Probing pop-up window, fill in the relevant fields.
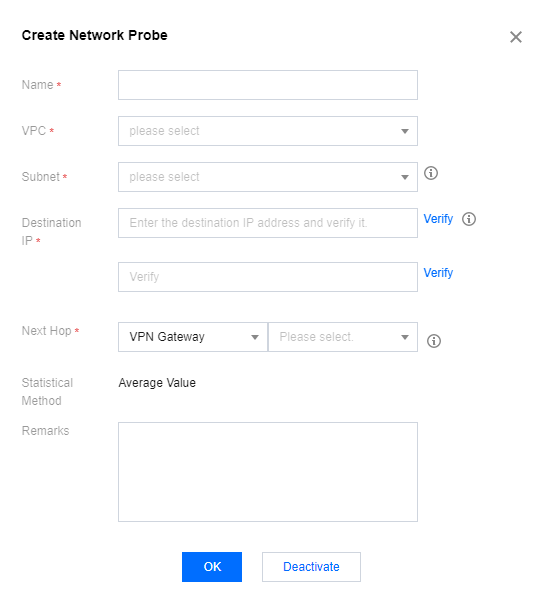
Field Description:
| Field | Meaning |
|---|---|
| Name | The name of network probing. |
| Virtual Private Cloud,VPC | The VPC where the probing source IP is located. |
| Subnet | The subnet where the probing source IP is located. |
| Probing Destination IP | Network probing supports up to two destination IP addresses. Please enable ICMP firewall policy for the destination host of network probing. |
| Next Hop | For source next hop routes, please select the source next hop type and specific instances. Currently supported source next hop gateway types include: NAT gateway, peering connection, VPN gateway, direct connect gateway and CVM. Note: - After the next hop object is configured, the system will automatically add the corresponding 32-bit route to the route table associated with the subnet. - The network probing route is a system route and cannot be modified. - When switching a subnet's route, this system route will be deleted from the original subnet's associated route table and added to the subnet's newly created route table. |
- After filling in the fields, click Verify after Probing Destination IP.
- If the connection succeeded, click OK.
- If the connection failed, please check whether the subnet route is correctly configured or whether the destination probing target has allowed traffic through network ACLs, security groups, or other firewall rules. For details, see Manage Network ACL and Modify Security Group Rules.
Check Network Probing Latency and Packet Loss Rate
- Log in to the VPC console.
- In the left menu, click Network Probing.
- In the Monitoring column of the target network probing instance, click the monitoring icon to view the network probing latency and packet loss rate.
Modify Network Probing
- Log in to the VPC console.
- In the left menu, click Network Probing.
- In the list of network probing instances, find the network probing instance to be modified, and click Edit in the Operation column on the right.
- In the Edit Network Probing dialog box, enter the information to be modified and click OK.
Note:
Name modification, probing destination IP, source next hop routing and annotation are supported.
Delete Network Probing
- Log in to the VPC console.
- In the left menu, click Network Probing.
- In the list of network probing instances, find the network probing instance to be modified, and click Delete in the Operation column on the right.
- In the pop-up confirmation box, click Delete.
Note:
Deleting a network probing instance will also delete associated alarm policies and route configurations of the network probing. Please assess the business impact and proceed with caution.
Configure Alarms
You can configure monitoring alarms for network probing. When a routing exception is detected, users can be alarmed in time to quickly switch the route and ensure service availability.
- Log in to the Alarm Policy console.
- Click Create.
- In the pop-up Create Alarm Policy dialog box, fill in the policy name, set Policy Type to Virtual Private Cloud/Network Probing, select specific instances, configure alarm triggering conditions, alarm notifications and other information, and then click Complete.