

This document describes how to use CFS on a Linux client.
Prerequisites
- Before creating a file system, ensure that the VPC and subnet are available. It is recommended that the subnet of the Linux-based CVM instance and the mount target of the CFS should belong to the same VPC and be deployed in the same availability zone to reduce network latency and achieve a better user experience. If no VPC or subnet is available, configure them.
- Before creating a file system, ensure that a Linux-based CVM instance is available; otherwise, purchase and configure it.
Note:
Logging in to the CVM requires an administrator account (root account; for Ubuntu system users, ubuntu account) and the password set during the purchase process.
Operation Steps
Step 1: Creating a File System and Its Mount Point
For detailed steps, see Creating File Systems and Mount Points.
Step 2: Connecting to an Instance
This section describes how to log in to a Linux-based CVM instance. The login method varies depending on scenarios. Logging in to the instance through the console is described here.
- In the operation column of the CVM Instances list, click Log In to connect to the Linux-based CVM instance through VNC.
- Enter the account and password for login.
Note:
This instance is exclusive, meaning that only one user can log in through the console at a time.
Step 3: Verifying Network Communication
Before mounting, check the network connectivity between the client and the file system. You can use the telnet command for verification, for example, telnet 192.168.1.1 111. The specific protocols and open ports are as follows:
| File System Protocol | Open Port | Check the Network Connectivity of a Specific Port |
|---|---|---|
| NFS 3.0 | 111, 892, and 2049 | telnet 111, 892, and 2049 |
| NFS 4.0 | 2049 | telnet 2049 |
| CIFS/SMB | 445 | telnet 445 |
Note:
If the connection fails, check the security group rules of the client to ensure that access to the above ports is allowed, and ensure that the IP address of the cloud file system is included within the source and destination IP ranges.
Step 4: Mounting a File System
Method 1: Mounting via the Console
You can install the NFS client via the console and mount the corresponding file system. For detailed operation steps, see Mounting a File System via the Console or CFS Client Assistant.
Method 2: Mounting via the Command Line
Mounting an NFS File System
Install and launch the NFS client. Before mounting, make sure that
nfs-utilsornfs-commonhas already been installed in the system. The installation method is as follows:CentOS:
sudo yum install nfs-utilsUbuntu or Debian:
sudo apt-get install nfs-common
Create a destination mount directory with the following command:
mkdir <destination mount directory>Example:
mkdir /localfolder/
mkdir /localfolder/test
Mount the file system.
Mount NFS v4.0 with the following command:
//Go to the CFS console > File System > Mount Target Info to obtain the following command. As some old file system versions do not support the noresvport parameter, it is recommended to use the version-specific commands provided in the console. After norevsport is configured, a new TCP port can be used for reconnection, which guarantees that the client and file system can stay connected during network recovery. Therefore, the norevsport parameter is recommended.
//Some old versions of Linux kernels need to be mounted using vers=4. If an exception occurs when vers=4.0 is used, change it to vers=4.
sudo mount -t nfs -o vers=4.0,noresvport <mount point IP>:/ <destination mount directory>
- Mount point IP: It is automatically generated when the file system is created.
- By default, NFS v4.0 is mounted under the root directory
/of the file system. It can also be mounted to a subdirectory created in the file system. - Destination mount directory: This refers to the target directory to be mounted to on the current server. It needs to be created in advance.
Note:
Note that there is a space between
<mount point IP>:/and<destination mount directory>.
Example:
Mount to the root directory of CFS:
//Go to the CFS console > File System > Mount Target Info to obtain the following command. As some old file system versions do not support the noresvport parameter, it is recommended to use the version-specific commands provided in the console. After norevsport is configured, a new TCP port can be used for reconnection, which guarantees that the client and file system can stay connected during network recovery. Therefore, the norevsport parameter is recommended.
//Some old versions of Linux kernels need to be mounted using vers=4. If an exception occurs when vers=4.0 is used, change it to vers=4.
sudo mount -t nfs -o vers=4.0,noresvport 10.0.24.4:/ /localfolder
Mount to the subdirectory of CFS:
//Go to the CFS console > File System > Mount Target Info to obtain the following command. As some old file system versions do not support the noresvport parameter, it is recommended to use the version-specific commands provided in the console. After norevsport is configured, a new TCP port can be used for reconnection, which guarantees that the client and file system can stay connected during network recovery. Therefore, the norevsport parameter is recommended.
//Some old versions of Linux kernels need to be mounted using vers=4. If an exception occurs when vers=4.0 is used, change it to vers=4.
sudo mount -t nfs -o vers=4.0,noresvport 10.0.24.4:/subfolder /localfolder
Mount NFS v3.0 with the following command:
sudo mount -t nfs -o vers=3,nolock,proto=tcp,noresvport <mount point IP>:/<fsid> <destination mount directory>
- Mount point IP: It is automatically generated when the file system is created.
- Destination mount directory: This refers to the target directory to be mounted to on the current server. It needs to be created in advance.
Note:
Note that there is a space between
<mount point IP>:/<FSID>and<destination mount directory>.
Below is an example of mounting to a CFS subdirectory:
sudo mount -t nfs -o vers=3,nolock,proto=tcp,noresvport 10.0.24.4:/z3r6k95r /localfolder
View the mount point information.
After the mount is completed, run the following command to view the mounted file system:mount -lIf there is a lot of information on the page, for easy queries, you can use grep to filter out the desired file system type.
mount -l | grep nfs //Used to filter out all NFS file systems.
mount -l | grep lustre  //Used to filter out all Turbo file systems.
Alternatively, run the following command to view the capacity information about the file system.
df -hNote:
- To avoid misoperations, do not repeatedly mount a mounted CFS file system or file system directory unless it is necessary.
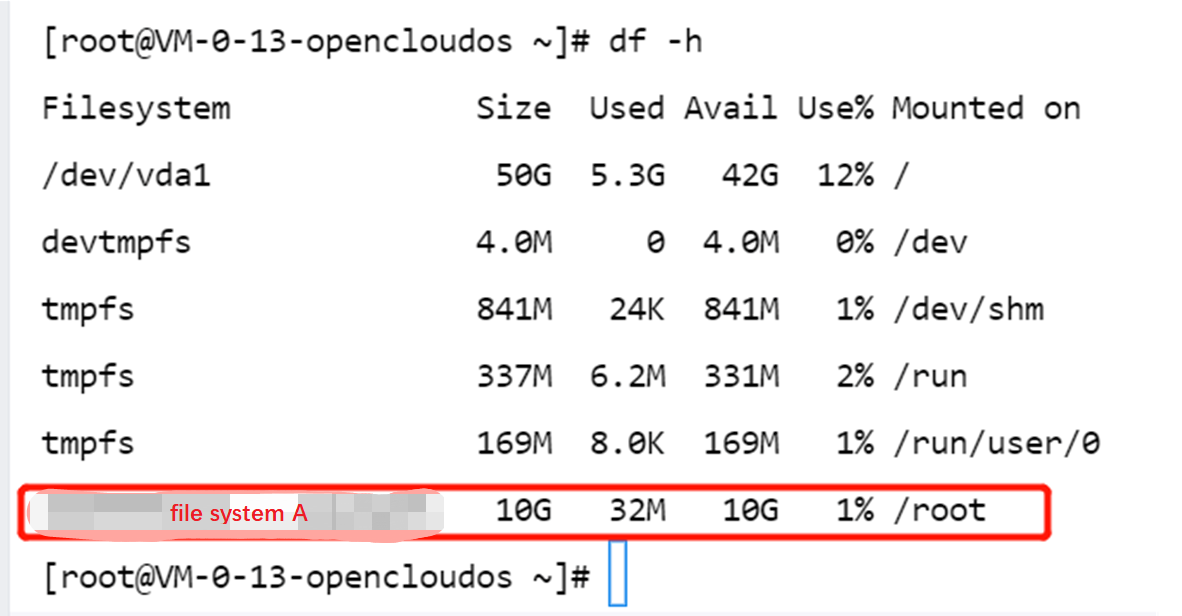
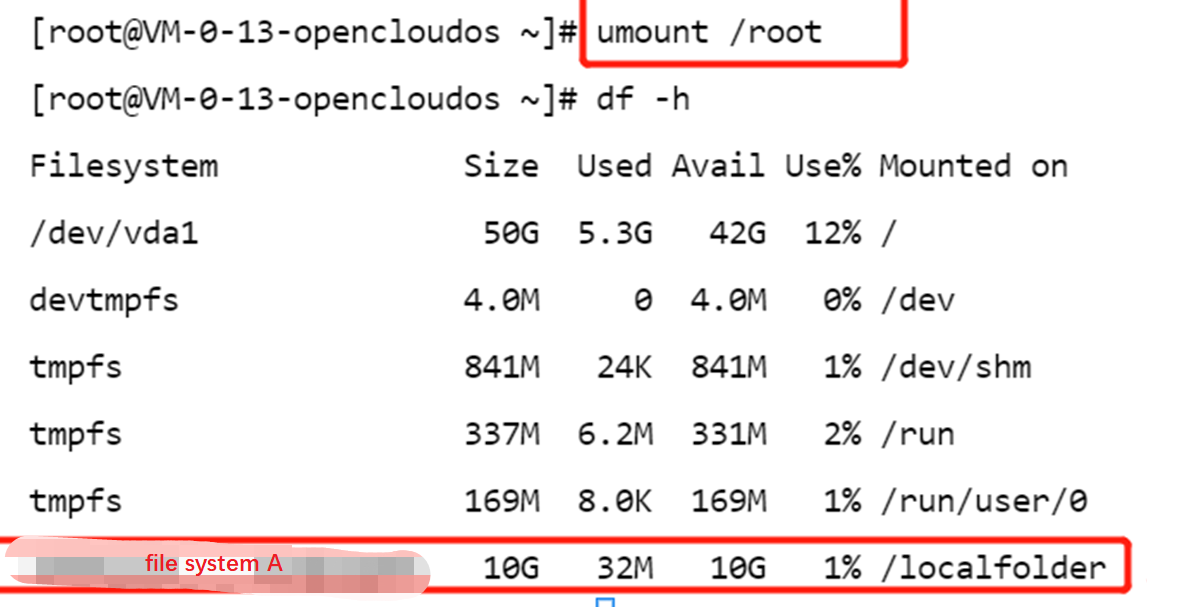
- If an overlapping or inclusion relationship exists in the directory to be mounted, it is impossible to display all file system mount results by using df -h only. It is recommended to use it in combination with mount -l to view all mount point information.
For example, when file system A is mounted to both /root/ and /root/localfolder/, using mount -l can query all mount target information, while using df -h can only query the file systems under /root/ . After the file systems in the root directory are unmounted, executing df -h can query the file systems in the /root/localfolder/ directory.
- mount -l execution result:

- df -h execution result:
Mounting a CIFS/SMB File System
Install and launch the CIFS client. Before mounting, make sure that
cifs-utilshas already been installed in the system. The installation method is as follows:sudo yum install cifs-utils.x86_64 -y //CentOSCreate a destination mount directory using the following command:
mkdir <destination mount directory>Example:
mkdir /local/
mkdir /local/test
The command used to mount file systems is as follows:
# Parameter description: # vers: supports protocol versions 2.1 and 3.0. Version 1.0 is used by default. # uid: owner of the file when the mount is completed. If not specified, uid=0 is used by default. # gid: user group that owns the file when the mount is completed. If not specified, gid=0 is used by default. # The uid and gid parameters are for apps that need to check the file owner during execution. In this case, you need to set the uid and gid to the app account. # noperm: The client does not perform permission verification. If a permission is denied, add this parameter. # actimeo: file attribute (metadata timestamps) cached by the client. # nocase: By default, using version 1.0 on mount is case-sensitive. However, Windows clients are case-insensitive. If you create a file on the Linux CIFS client and the file name already exists on the Windows client, an exception may occur when you access the file through the Windows client. # Example: mount -t cifs -o guest,vers=1.0,uid=1000,gid=100,noperm,actimeo=1,nocase //<mount point IP>/<FSID> /<destination mount directory>- Mount point IP: It is automatically generated when the file system is created.
- By default, the FSID of the file system is used for the mount.
- Destination mount directory: This refers to the target directory to be mounted to on the current server. It needs to be created in advance.
Note:
Note that there is a space between
<FSID>/and<destination mount directory>.
Example:
mount -t cifs -o guest //10.66.168.75/vj3i1135 /local/testView the mount point information.
After the mount is completed, run the following command to view the mounted file system:mount -lIf there is a lot of information on the page, for easy queries, you can use grep to filter out the desired file system type:
mount -l | grep cifs //Used to filter out cifs file systems.Alternatively, run the following command to view the capacity information about the file system.
df -hNote:
- To avoid misoperations, do not repeatedly mount a mounted CFS file system or file system directory unless it is necessary.
- If an overlapping or inclusion relationship exists in the directory to be mounted, it is impossible to display all file system mount results by using df -h only. It is recommended to use it in combination with mount -l to view all mount point information.
Step 5: Unmounting a Shared Directory
If you need to unmount a shared directory in some cases, run the following command, where "directory name" is the root directory or the full path of the file system.
sudo umount <directory name>
Example:
sudo umount /local/test
Note:
If an overlapping or inclusion relationship exists in the directory to be mounted, it is impossible to display all file system mount results by using
df -honly. It is recommended to use it in combination withmount -lto view all mount target information.
Step 6: Terminating Resources
You can terminate a file system in the console. That is, you can go to Manage File Systems, locate the file system to be terminated, and then click Delete and Confirm.
Note:
Resources cannot be recovered from a deleted file system. Therefore, it is recommended to use the snapshot feature to back up all resources before deleting the file system.