

As a service user, endpoints are associated with endpoint services, establishing network connections for accessing external services through VPC private links.
Create Terminal Node
This section provides guidance on creating terminal nodes.
Prerequisites
VPC, subnet, and CVM have been created.
Operation Guide
- Log in to the VPC console.
- Click VPC Endpoint > Endpoint on the left sidebar.
- Terminal node support both IPv4 and IPv6 scenarios.
IPv4
- On the IPv4 tab, click on Create.
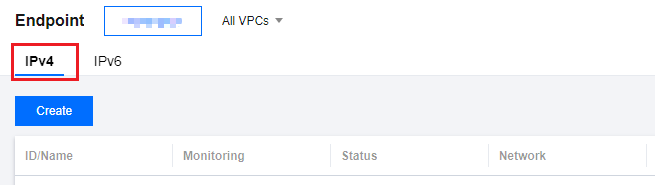
- In the pop-up dialog box for Create Endpoint, configure the terminal node parameters.
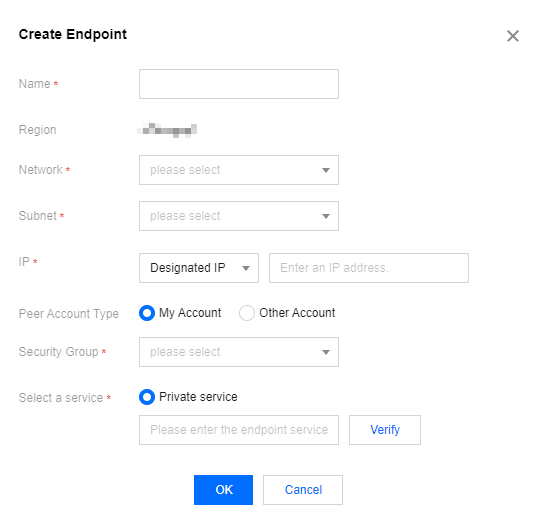
Parameter description:- Name: custom the name of the endpoint.
- Region: The region where the endpoint is located.
- Network: Select the VPC where the endpoint is located.
- Subnet: Select the subnet where the endpoint is located.
- IP: the IP address of the endpoint. You can specify an IP address, which should be a private IP address within the VPC, or opt for automatic IP assignment.
- Peer account type: Select the owning account of the VPC that needs access. My Account indicates access within the same account VPC, while Other Accounts signifies cross-account VPC access. For cross-account access, it is necessary to inform the peer account of your account number, and after initiating a connection request, server-side acceptance is required for connectivity.
- Select a service: Enter the ID of the endpoint service and click Verify. Only services that have passed verification can be connected.
- After the parameter settings are completed, click OK.
- IPv6
- On the IPv6 tab, click Create.
- On the IPv4 tab, click on Create.

5. In the pop-up dialog box for Create Endpoint, configure the terminal node parameters.
Parameter description:
- Name: custom the name of the endpoint.
- Region: The region where the endpoint is located.
- Network: Select the VPC where the endpoint is located.
- Subnet: Select the subnet where the endpoint is located.
- IP: the IP address of the endpoint. You can specify an IP address, which should be a private IP address within the VPC, or opt for automatic IP assignment.
- Peer account type: Select the owning account of the VPC that needs access. My Account indicates access within the same account VPC, while Other Accounts signifies cross-account VPC access. For cross-account access, it is necessary to inform the peer account of your account number, and after initiating a connection request, server-side acceptance is required for connectivity.
- Select a service: Enter the ID of the endpoint service and click Verify. Only services that have passed verification can be connected.
6. After the parameter settings are completed, click OK.
Bind/Unbind Security Groups
Bind a security group to the endpoint to control the inbound traffic, and improve the security of business access.
Operation Guide
- Log in to the Security Group Console, create a security group and set its rules.
- On the security groups tab in the endpoint details page, you can bind or unbind security groups to the endpoint, as well as adjust the priority of the security groups.
Data Verification
Obtain the VIP and vport of the CLB for the terminal node service provider, and access it in CVM according to the access method of the service provider, such as MySQL client, IE browser, etc.
Monitoring
Metric monitoring helps you understand the real-time status of your services. If any anomalies occur, you can detect and address them promptly, thus improving operational efficiency.
Directions
- Click the monitoring icon in the Endpoint Monitoring column to enter the metric monitoring interface for endpoint services.
- You can also click the Endpoint Service ID to enter the details page, then click the [Monitoring] tab to view the metrics.
- For monitoring metrics, you can perform operations such as data comparison, data export, and exporting images as needed.