

The Endpoint Service is created and maintained by the service provider and can be accessed by other VPCs through creating terminal nodes to establish private network connections.
Creating Endpoint Service
This section provides guidance on creating endpoint services.
Prerequisites
VPC, subnet, and application-type Layer-4 internal CLB have been created.
Operation Guide
- Log in to the VPC console.
- In the left navigation pane, click on VPC Endpoint > Endpoint Service.
- Terminal node services support both IPv4 and IPv6 scenarios.
IPv4
- On the IPv4 tab, click Create.
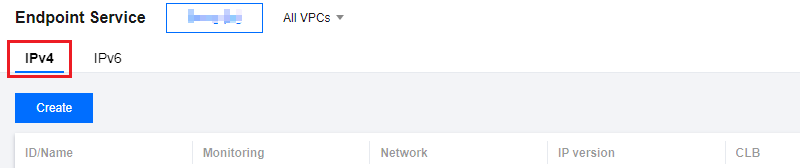
- In the pop-up Create Endpoint Service interface, configure the relevant parameters.
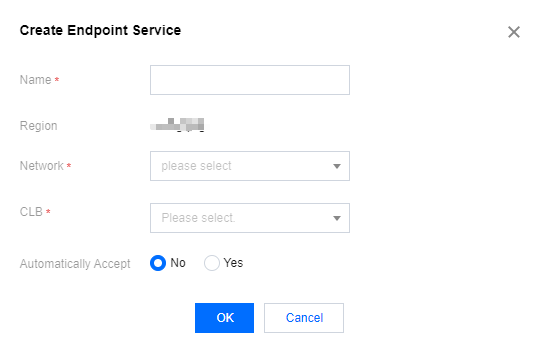
Parameter description:- Service name: custom the name of endpoint service.
- Region: region where the terminal node service is located.
- VPC: Select the associated VPC.
- Load Balancer: Choose the CLB (Cloud Load Balancer) already created in the VPC; replacement is allowed.
- Auto Accept: Specifies whether the terminal node service automatically accepts connection requests initiated by terminal nodes. By default, it is set to No and can be changed.
- If it is the same account, then Auto Accept is available.
- If it is a cross-account, when select Auto Accept and the endpoint is in the user allowlist, then the endpoint is available upon successful creation.
- If it is cross-account and Auto Accept is not selected, the initial status of the successfully created endpoint is Pending Acceptance, and it needs to be accepted by the server-side to become available.
- After completing the parameter settings, click Confirm to complete the creation of the IPv4 terminal node service.
- On the IPv4 tab, click Create.
IPv6
- On the IPv6 tab, click Create.

- In the pop-up Create Endpoint Service interface, configure the relevant parameters.
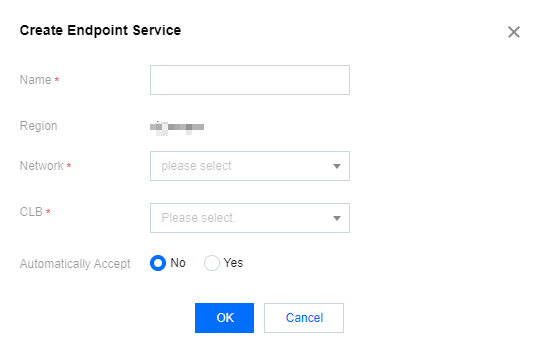
Parameter description:- Service name: custom the name of endpoint service.
- Region: region where the terminal node service is located.
- VPC: Select the associated VPC.
- Load Balancer: Choose the CLB (Cloud Load Balancer) already created in the VPC; replacement is allowed.
- Auto Accept: Specifies whether the terminal node service automatically accepts connection requests initiated by terminal nodes. By default, it is set to No and can be changed.
- If it is the same account, then Auto Accept is available.
- If it is a cross-account, when select Auto Accept and the endpoint is in the user allowlist, then the endpoint is available upon successful creation.
- If it is cross-account and Auto Accept is not selected, the initial status of the successfully created endpoint is Pending Acceptance, and it needs to be accepted by the server-side to become available.
- After completing the parameter settings, click Confirm to complete the creation of the IPv4 terminal node service.
- On the IPv6 tab, click Create.
Managing User Allowlist
Used to manage the accounts allowed to access the terminal node service.
Allowlist management follows the following principles:
- When the terminal node service is set to auto-accept, users in the allowlist will be automatically accepted when creating terminal nodes, and the terminal nodes will be available as soon as they are created.
- If it is across accounts and the UIN of the terminal node is not in the allowlist of the target terminal node service, the creation will fail directly with an error, indicating that the terminal node service does not allow the connection.
- If it is across accounts and the UIN of the terminal node is in the allowlist of the target terminal node service, the initial state of the successfully created terminal node will be pending acceptance. It will become available after being accepted by the server.
- Within the same account, auto-accept turns into available.
Prerequisites
Have obtained the user account information for the terminal node.
Directions
- Click on the ID of the created terminal node service to access the details page.
- click Allowlist tab to enter the User Allowlist Management interface.
- Click Add to enter the Add Users to Allowlist interface.
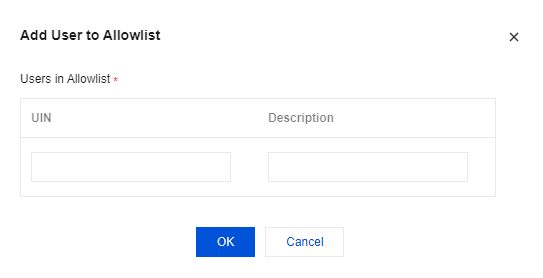
- Enter the user's UIN and description. After adding the user to the allowlist, click OK. The successfully added allowlist will be displayed in the list.
Managing Endpoint Connections
Users manage connection requests initiated by terminal nodes.
Directions
- Click on the ID of the created terminal node service to access the details page.
- Click the Endpoint Connection tab to enter the Endpoint Connection Management interface.
- Handle the status connection requests of the terminal nodes based on the actual situation.
Endpoint connections have three statuses: Pending Acceptance, Available, and Denied.- For connections in the Denied state, you can perform the Acceptance operation. After execution, the status becomes Available.
- For connections in the Available state, you can perform the Deny operation. After execution, the status becomes Denied.
- For connection requests in the Pending Acceptance state, you can perform Acceptance or Deny, and after execution, the status becomes Available or Denied, respectively.
Note: The endpoint service can be connected by multiple endpoint. The status of the endpoint service refers to the status of each connection, not the status of the endpoint service alone.
Manage CLB Instances
Users manage the CLB of the endpoint service. When the endpoint service has no available connection status, changing the CLB is supported.
Directions
- In the list, find the endpoint service to be processed, click More > Manage CLB Instances in the Action column, and a Manage CLB Instances dialog box will pop up.
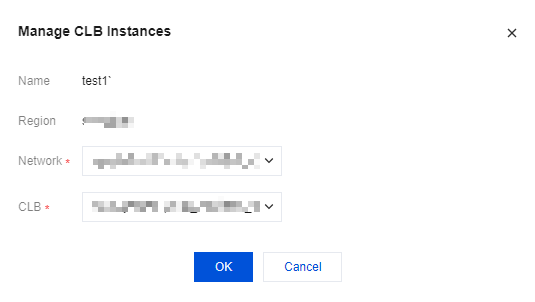
- In the dialog box, select the network and CLB, and click [OK].
Modify Endpoint Connection Accepting Settings
Users can set whether the endpoint service needs to automatically accept connection requests.
Directions
- In the list, find the endpoint service to be processed, click More > Modify Endpoint Connection Accepting Settings in the Action column, and a Modify Endpoint Connection Accepting Settings dialog box will pop up.
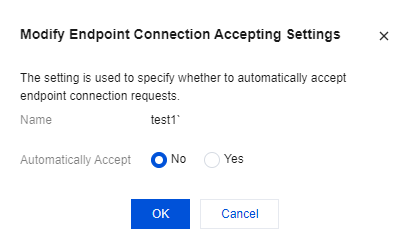
- In the popup, select "Yes" or "No", then click OK.
Monitoring
Metric monitoring helps you understand the real-time status of your services. If any anomalies occur, you can detect and address them promptly, thus improving operational efficiency.
Directions
- Click on the monitoring icon in the endpoint service monitoring column to access the metric monitoring interface of the terminal node service.
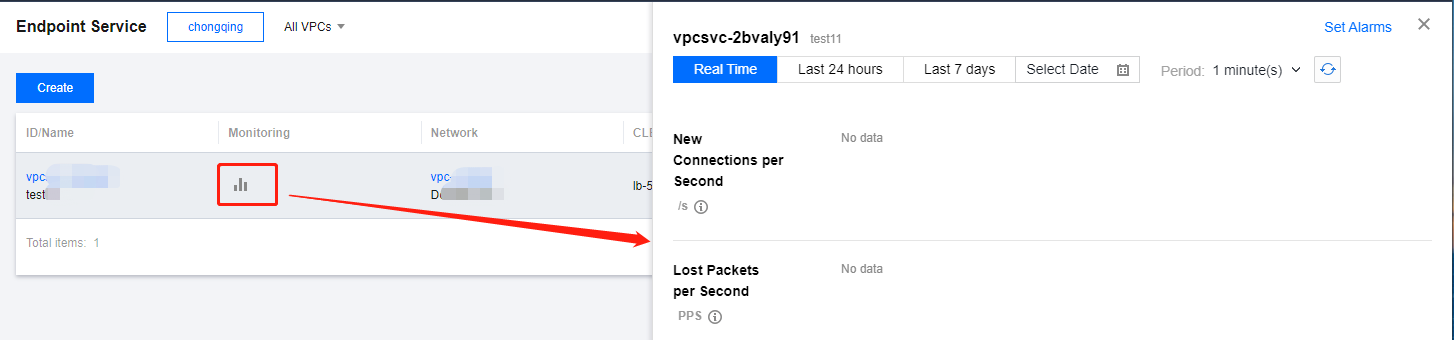
- Alternatively, you can click on the terminal node service ID to enter the details page and then click on the Monitoring tab to view the metric information.

- For monitoring metrics, you can perform operations such as data comparison, data export, and exporting images as needed.
