

Creating Custom Route Tables
In addition to the default route table automatically generated by the system, you can also create new custom route tables.
- Log in to the VPC Console.
- Click Route Table in the left sidebar to go to the route table management page.
- Click Create.
- In the pop-up window, enter the route table name, select the VPC to which the route table belongs, configure a routing policy, and click Create.
Note:
When the next hop is Peering Connection or Direct Connect Gateway, you can enter an IPv6 address.

Configuring Routing Policies
- Log in to the VPC Console.
- Click Route Table in the left sidebar to go to the route table management page.
- In the list, click the route table ID that needs to be modified to enter the details page.
- Click Add Routing Policy to add a route policy.
- In the pop-up box, enter the destination IP range and select the next hop type (Public Network Gateway, VPN Gateway, Direct Connect Gateway, etc.) and the next hop ID.
| Configuration | Description |
|---|---|
| Destination | Specify the destination IP range to which you want to forward traffic. |
| Next Hop Type | Indicates the egress of data packets for the VPC. Supported types: - VPN Gateway: The traffic directed to a destination IP range is forwarded to a VPN Gateway. - Direct Connect Gateway: The traffic directed to a destination IP range is forwarded to a direct connect gateway. - Peering connections: The traffic directed to a destination IP range is forwarded to the VPC peer of a peering connection. - NAT Gateway: The traffic directed to a destination IP range is forwarded to a NAT Gateway. - CVM: The traffic directed to a destination IP range is forwarded to a public network gateway in the VPC (a CVM instance with forwarding enabled). - Public IP of CVM: The traffic directed to a destination IP range is forwarded to the public IP address (including EIPs) of a CVM instance in the VPC. |
| Next Hop | Specify the next hop instance to which the traffic is redirected, such as a gateway or CVM IP. |

6. Click OK and the routing policy takes effect immediately.
7. (Optional) After adding a custom routing policy, you can click Edit or Delete in the routing policy operation column to modify or delete the routing policy.
Changing the Subnet Route Table
- Log in to the VPC Console.
- Click Subnet in the left sidebar to enter the Management page.
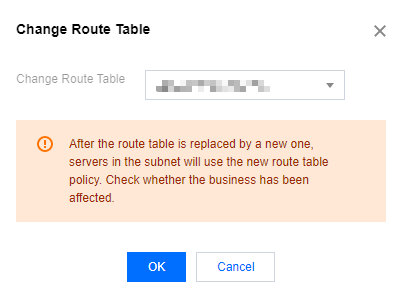
- Click Change Route Table in the Operation column on the right side of the subnet that needs to change the route table.

- In the pop-up window, select the new route table and click OK.
Deleting Custom Route Tables
The system-generated default route table cannot be deleted, but custom route tables can be created, modified, and deleted.
- Log in to the VPC Console.
- Click Route Table in the left sidebar to go to the route table management page.
- Click Delete in the Operation column on the right side of the route table that you want to delete.

