

This section introduces how to set a fixed outbound access IP if your cluster requires proactive outbound access.
Requirement Scene
This solution is applicable when your clusters in the scaling group have all the three requirements below:
- Accept requests from the Cloud Load Balancer (CLB).
- The cluster machine needs to initiate outbound access.
- For outbound access, you may want to use a fixed public network IP.
You can set it up through the following scheme.
Solution Overview
- Receive and respond to external requests by using the CLB.
- Place the machine into the subnet of VPC and direct the route table to the NAT Gateway, so all proactive outbound access requests are sent through the NAT Gateway's public network IP.
- The network attribute of the scaling group is set as this subnet so that all scale-out machines will use the NAT Gateway for outbound access.
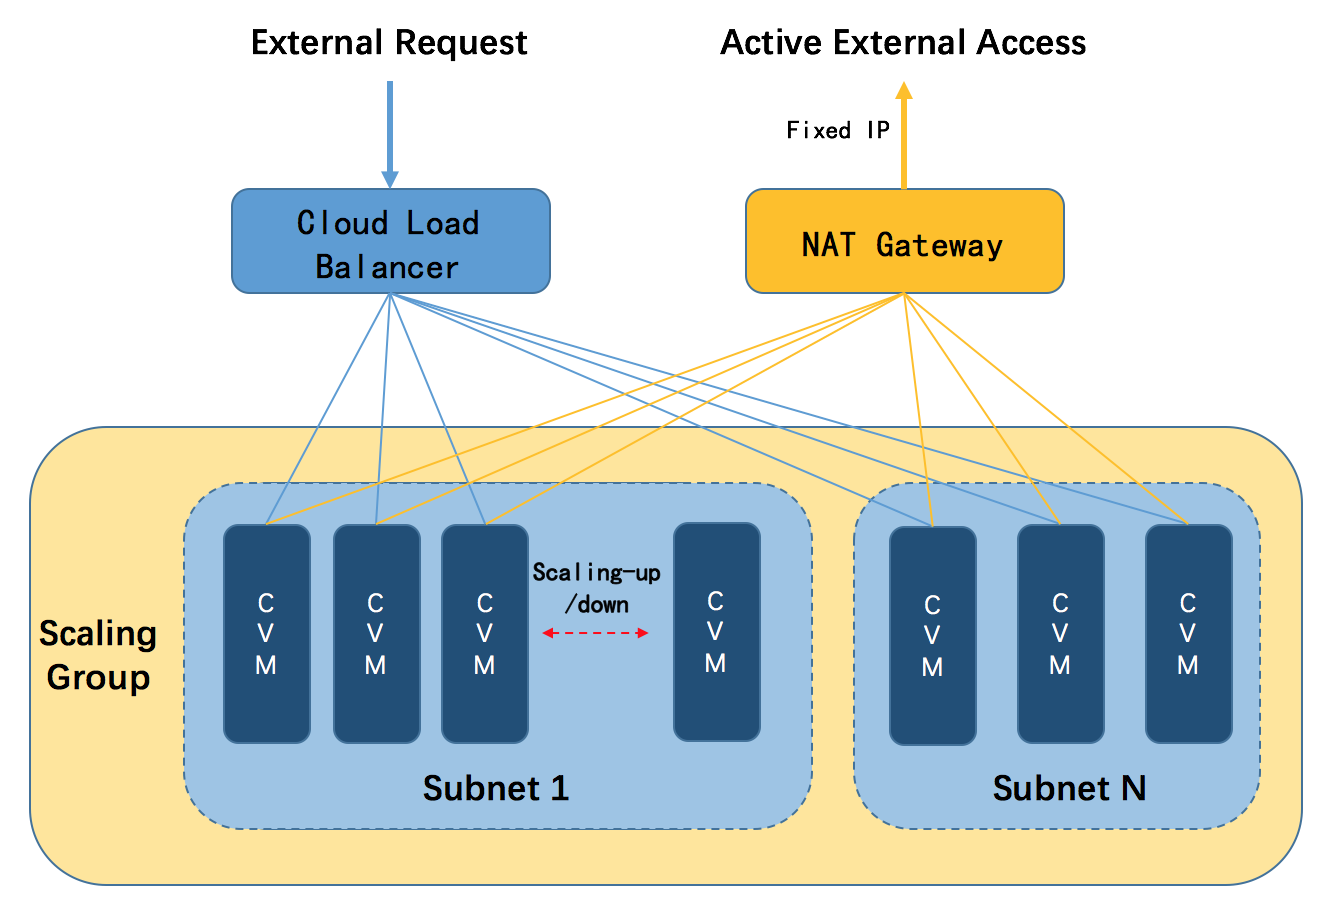
Methods for Setting
Step 1: Create VPC and Subnet
1. Creating VPC
- Log in to the cloud console, and click Virtual Private Cloud in the sidebar to enter the VPC console.
- Select a region from the dropdown list above the list, and click Create to create a VPC.
- Enter the names of VPC and subnet as well as CIDR, and select the availability zone for the subnet.
- Click Create.
2. Creating subnet
- Log in to the cloud console, click Virtual Private Cloud in the sidebar, and click Subnet in the left sidebar. Select a region and VPC from the dropdown list.
- Click Create, fill in the subnet name, CIDR, availability zone, and associated route table.
- Click Create to confirm.
After completing the creation, you can purchase machines for this subnet.
Step 2: Create NAT Gateway
1. Purchase
- Log in to the cloud console, select the Virtual Private Cloud, and select NAT Gateway.
- Click Create in the upper left corner, and enter or confirm the following parameters in the pop-up box:
- Gateway Name
- Gateway Type (which can be modified after creation)
- VPC of the NAT Gateway service (the one you just created)
- Assign an elastic IP to the NAT Gateway, which will be the static IP for your machine's outbound access in the future.
- After selection, click Create button to complete the creation of the NAT Gateway.
- After the NAT Gateway is created, you need to configure the routing rules on the route table page in the VPC console to redirect the subnet traffic to the NAT Gateway.
2. Setting the route table (Key step)
- Log in to the cloud console, click Virtual Private Cloud in the sidebar to enter the VPC console, and select Route Table.
- In the route table list, click the route table ID associated with the subnet that needs to access the Internet to enter the route table details page, then click Add Routing Policy in the routing policy.
- Click to add a new line, fill in the destination (for example, in this scene, you can fill 0.0.0.0/130618223492100096), select NAT Gateway for the next hop type, select the created NAT Gateway ID, then click Create.
Now, machines in this subnet, even without a public network IP, can also actively outbound access through the NAT Gateway, presenting a static IP externally.
As shown in the figure below, even if one purchases a host without a public network IP and with 0 bandwidth, it can still actively outbound access:
However, the scaling group needs to recognize this subnet and ensure that all machines are created on this subnet.
Step 3: Set Scaling Group
The purpose of this step is to direct the subnet information to the scaling group, so the new scale-out machines will be launched in this subnet.
This way, the scale-out machines will automatically use the NAT Gateway's IP address for outbound access, achieving the effect of a static exit IP.
In the auto scaling console, click Create:
- Fill in the scaling group name, launch configuration (the launch configuration should be set up in advance), maximum scaling number, minimum scaling number, starting instance count, and other information.
- Select Network and Subnet, and direct to the VPC and subnet you have just set up (important).
So far, the setting is complete.