

To create a complete AS scheme, you need to complete the following 3 steps:
Note:
The operations in the following example use the console mode.
Creating launch configuration
A launch configuration defines the configuration information for AS's CVM instances, including the CVM's image, storage, network, security groups, log-in methods, and other configuration information.
Note:
Creating a launch configuration service is completely free. Feel free to create.
- Log in to the AS console.
- In the left sidebar, click Launch Configuration to enter the Launch Configuration management page.
Selecting a region
- Select the region for the launch configuration.
- Click Create, and fill in the basic information of the launch configuration on the pop-up page.
Selecting Region and Model
In the 1. Select Region and Model page, fill in the Launch Configuration Name, select Region, and select Instance.
- Name the configuration.
- Select the same model of the instance that you want to bind to the scaling group.
Selecting an image
A launch configuration can be created using a public image or custom image.
It is recommended to use a custom image with a pre-deployed environment for the following reasons:
- If a public image is selected, the instances scaled out have a clean OS, and you still need to deploy the application environment manually.
- If a custom image is selected, create an image from a CVM instance with a pre-deployed environment and then use this image to batch create CVM instances. The newly created CVM instances have the same software environment as that of the previous CVM instance, thus achieving the purpose of batch deployment.
Selecting Storage and Bandwidth
In the 3. Select Storage and Bandwidth page, set the disk and network.
Note:
If a CBS is chosen for the system disk, then the data disk can be a data disk snapshot.
For users with a large amount of data, data disks are often used to store data. When a data disk A creates a snapshot, users can use this snapshot file to quickly clone multiple disks, achieving rapid deployment of servers.
When AS automatically adds a new cloud service instance, if a data disk snapshot is specified in the launch configuration, CBS can support auto-mounting a data disk containing set data after the cloud service instance starts, meeting the need for automatic data copying.
If a data disk snapshot is specified in the launch configuration, ensure the data disk can be automatically mounted correctly so that the scaling group can auto-scale successfully. You need to perform some operations on the original instance that made the data disk snapshot before setting AS to support automatic data disk mounting when a new cloud service instance is started.
Note:
The AS service is free. The added servers, disks, and networks will be charged based on the volume of CVM instances, disks, and networks. Prices will be shown based on your settings.
Setting information
- On the 4. Set Security Group and CVM page, select the log-in method and security group. CVM instances added by the AS service enjoy Cloud Security and Cloud Monitor services for free by default.
Note:
In the advanced settings, if the instance type of the extension you created has been set by the administrator to not support placement groups, the placement group feature will be unavailable. If you need to make a change, please contact the administrator.

2. After the configuration is completed, this entry will be displayed in the launch configuration list on the page.
Creating scaling group
A scaling group contains a collection of CVM instances that follow the same rules and have a shared purpose.
- Log in to the AS console.
- In the left sidebar, click Scaling Group to enter the scaling group management page.
Creating a scaling group
- Click Create and fill in the basic information of the scaling group on the pop-up page.
 is required.
- The current number of CVM instances in the scaling group will be maintained between the minimum and the maximum scaling group capacities.
- The starting instance count defines the initial number of CVM instances in the scaling group.
- If the current number of CVM instances is less than the minimum scaling number, the AS service will automatically add instances to match the minimum scaling number.
- If the current number of CVM instances exceeds the maximum scaling number, the AS service will automatically reduce instances to match the maximum scaling number.
- Select an existing launch configuration or create a new one.
- Select the network and removal policies.
- (Optional) Select an existing CLB policy to associate or create a new CLB.
- The current number of CVM instances in the scaling group will be maintained between the minimum and the maximum scaling group capacities.
- After the configuration is completed, this entry will be displayed in the scaling group list on the page.

 is required.
Adding instances (optional)
Add the instances to be bound to the instance list. After the configuration is completed, this entry will be displayed in the launch configuration list on the page, as shown below:
Note:
If you are unable to add or remove instances here, please check the maximum and minimum scaling numbers you have set.
Creating a scaling policy;
AS group adjusts the number of cloud service machines according to the scaling policies:
- Create scheduled tasks to perform scheduled scaling activities, and you can also set whether to perform them periodically.
- Create alarm-triggered scaling policies to perform scaling based on the cloud monitor metrics (such as CPU, memory usage rate, etc.).
Creating scheduled task
If you can predict your load changes, you can set up scheduled tasks to plan your device scale-out activities. This feature allows you to automatically increase or decrease CVM instances regularly and periodically to flexibly respond to business load changes, enhance device usage, and save costs on deployment and instances.
- On the Scaling Group page, click Scaling Group to enter the scaling group management page.
- Select the Scheduled Action tab, then click Create.
- On the Create page, specify the scheduled task name, execution time, and activities to be executed.
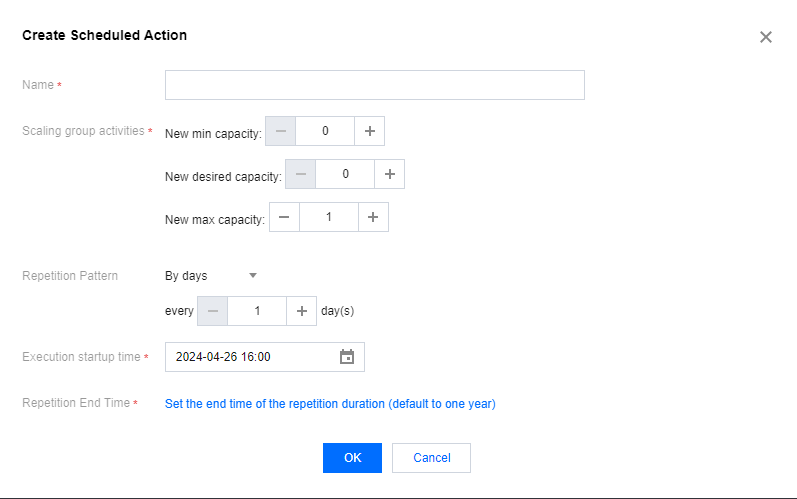
- After the settings are completed, the scheduled task will be displayed in the list on the page. See the example below:

Creating an alarm policy
If you want to adjust your business deployment based on CVM metrics, you can define your own alarm-triggered scaling policy. When business loads reach the threshold, this policy automatically increases or decreases the number of CVM instances. This allows flexible adaptation to changes in business load, improving device usage and saving on deployment and instance costs.
Note:
- When a scaling group is created, a ping unreachable alarm-triggered policy is created by default, which is used to replace unhealthy CVMs.
- Before using the Alarm-Triggered Scaling Policy, you need to install the latest version of the cloud monitor Agent in the CVM image.
- On the Scaling Group page, click Scaling Group ID to enter the scaling group management page.
- Select the Alarm Triggered Scaling Policy tab, and then click Create.
- On the Create page, set the Alarm-Triggered Scaling Policy. The policy is based on the cloud monitor performance metrics (such as CPU, memory, bandwidth, etc.) and automatically increases or decreases a specified number or percentage of CVM instances for the scaling group.
You can also copy the policy (optional), directly copying an existing scaling group's policy to the current group.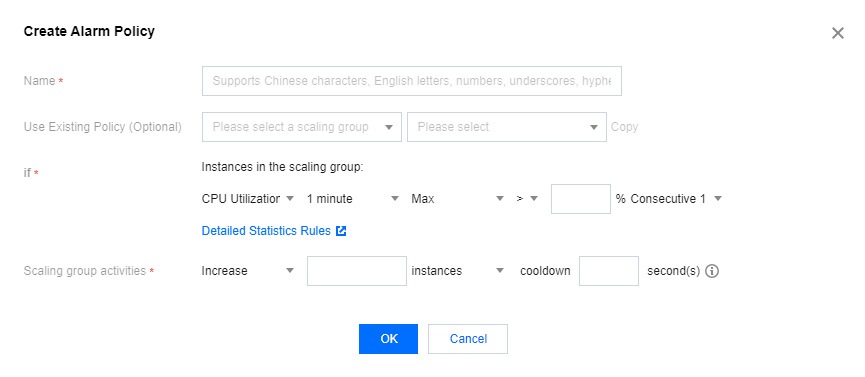
- After the settings are completed, this alarm-triggered scaling policy will be displayed in the list on the page.
