

Virtual Private Cloud (VPC) is fundamental for using cloud services. For example, when purchasing instances like CVM, you need to select the VPC to which the corresponding instance belongs. This document describes the lifecycle of VPC usage.
Background
- Create VPC: Before creating a VPC, you need to conduct network planning. The CIDRs of a VPC and subnet cannot be changed after creation.
- View VPC: You can view the basic information and the resources contained within a VPC.
- Delete VPC: When a VPC is deleted, its associated subnets and route tables will also be deleted.
Create VPC
A VPC contains at least one subnet, and only in the subnet can cloud service resources be added.
Log in to the Virtual Private Cloud Console.
Select Virtual Private Cloud in the left navigation bar.
On the Virtual Private Cloud page, select the region to which the VPC belongs and click Create.
In the pop-up New VPC dialog box, fill in the VPC information and initial subnet information.
Note:
VPCs and subnet CIDRs cannot be modified after creation.
- VPC CIDR supports using any of the following IP ranges. If there is a need for private network communication between different VPCs, make sure that the CIDR configurations of the VPCs at both ends do not overlap:
10.0.0.0-10.255.255.255(The mask range must be between 16 and 28.)172.16.0.0-172.31.255.255(the mask range must be between 16 and 28)192.168.0.0-192.168.255.255(the mask range must be between 16 and 28)- If there is a request to use another CIDR, contact the platform administrator to complete the deployment of custom CIDRs in the backend.
- Tag: You can add tags as needed, which helps you to manage your resources and can be adjusted on demand.
- The CIDR of the subnet must be within or the same as that of the VPC.
For example, if the IP range of a VPC is192.168.0.0/16, then the IP range of the subnet within that VPC can be192.168.0.0/16,192.168.0.0/17, and so on. - Within the same VPC, it is possible to have subnets located in different availability zones. By default, private network interconnection is available for subnets in different availability zones within the same VPC. The same VPC can have subnets of different availability zones. By default, subnets of different availability zones under the same VPC are private network interconnected.
- Associated route table: A subnet must be associated with a route table for traffic forwarding control. The initial subnet is associated with a default route table, which is delivered by the system by default and indicates private network interconnection within the VPC.
- VPC CIDR supports using any of the following IP ranges. If there is a need for private network communication between different VPCs, make sure that the CIDR configurations of the VPCs at both ends do not overlap:

5. After the parameters are set, click Create to complete the creation of the VPC, and the successfully created VPC is displayed in the list.
View VPC
- Log in to the Virtual Private Cloud Console.
- Select Virtual Private Cloud in the left navigation bar.
- In the VPC list, click the VPC ID you want to view.
The details page shows the basic information of and the cloud resources contained in a VPC, such as Cloud Virtual Machine and Cloud Load Balancer. Click the resource number to enter the corresponding resource management interface.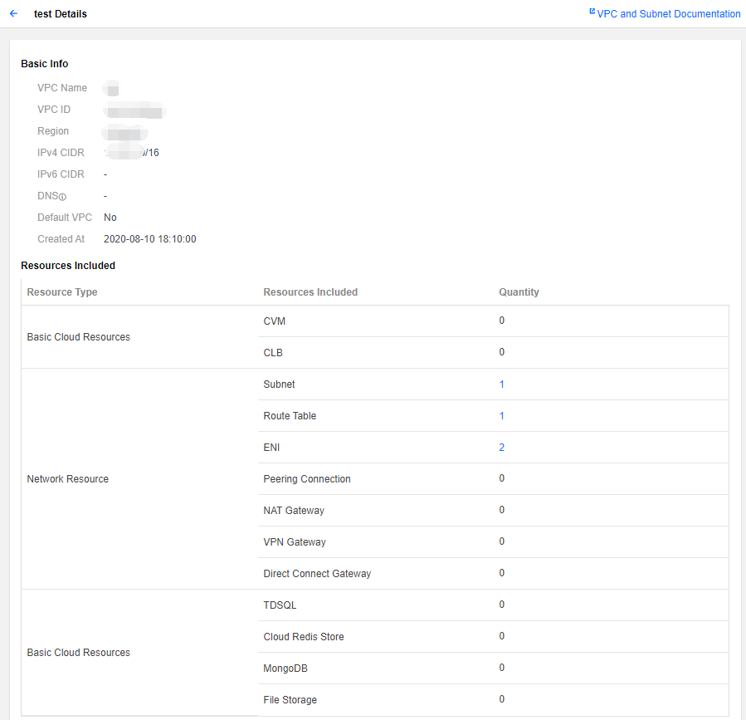
Export VPC List
VPC supports the list export feature.
- Log in to the Virtual Private Cloud Console.
- Select Virtual Private Cloud in the left navigation bar.
- Click the export icon at the top right of the interface to download the VPC list in .csv format to your local device.


Delete VPC
Note:
Prerequisites for VPC deletion: The IP addresses of the VPC to be deleted are not in use, and there are no cloud resources (such as CVM, cloud databases (CDB) and gateways) in the VPC.
- Log in to the Virtual Private Cloud Console.
- Select Virtual Private Cloud in the left navigation bar.
- In the VPC list, click Delete in the Action column to the right of the VPC to be deleted, and confirm the operation.