

Overview
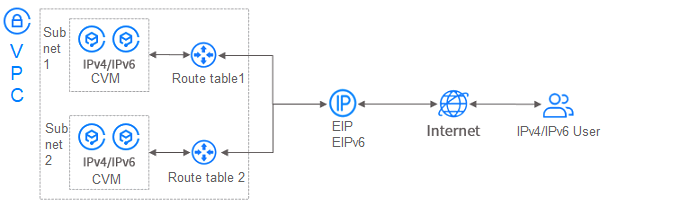
This tutorial will help you build a Virtual Private Cloud (VPC) with an IPv6 CIDR. IPv6 for the Cloud Virtual Machines (CVMs) or Elastic Network Interfaces (ENIs) in the VPC is enabled so that VPC and public network communications via IPv6 are implemented.
- CVMs are IPv6-enabled to communicate with other CVMs in the VPC through the IPv6 private network.
- CVMs are IPv6-enabled to communicate bidirectionally with IPv6 users on the Internet.
Instructions
- The IPv6 address is a GUA address. Each VPC is allocated with one
/56IPv6 CIDR. Each subnet is allocated with one/64IPv6 CIDR. Each ENI is allocated with one IPv6 address. - Both the primary network interface and the secondary network interface support applying for IPv6 addresses. For more information about the relationship between CVM and ENI, see Elastic Network Interface product documentation.
Directions
Step 1: Allocate IPv6 CIDR to VPC
- Log in to the Virtual Private Cloud console.
- In the left sidebar, choose VPC. Under the operation column of the row corresponding to the VPC where you want to enable IPv6, click Edit IPv6 CIDR.
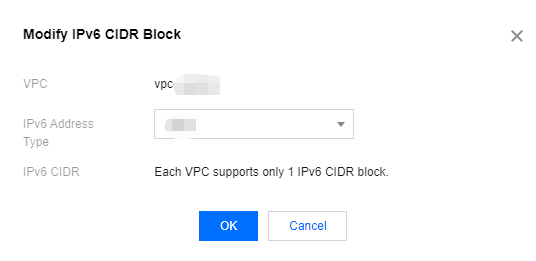
- In the pop-up dialog box Modify IPv6 CIDR Block, choose IPv6 address type and click OK to complete obtaining the VPC IPv6 CIDR. Currently, one VPC only supports one IPv6 CIDR.
Step 2: Allocate IPv6 CIDR to Subnet
- Log in to the Virtual Private Cloud console.
- In the left sidebar, choose Subnet. Under the operation column of the row corresponding to the subnet where you want to enable IPv6, click Assign Ipv6 CIDR.
- Click OK to confirm the operation. The system will allocate a
/64IPv6 CIDR from the VPC's/56IPv6 CIDR, and you can see the IPv6 address segment in the list.
Step 3: Purchase a CVM and allocate an IPv6 address to its ENI
Log in to the Cloud Virtual Machine Console.
At the top left of the list page, click Create to enter the CVM purchase page.
On the custom configuration page, configure CVM instances according to actual needs and interface prompts. Choose not to allocate IPv6 addresses temporarily.
Note:
If the CVM is not allocated with an IPv6 address when you purchase it, under the operation column of the row corresponding to the CVM instance, you can choose EIP > Manage IPv6 Addresses to allocate an IPv6 address to the primary NIC.
After purchasing the CVM, log in to the VPC console.
In the left sidebar, choose IP and NIC > ENI. Click Create to create an ENI under the subnet in Step 2, and bind it to the purchased CVM.
Click the ID of this ENI to go to the details page. Choose the IPv6 Address Management tab and click Allocate IP.
Note:
The standard quote of an ENI is one IPv6 address. If you need more IPv6 addresses, please contact the cloud platform administrator to modify the quota for you. A maximum of 10 IPv6 addresses can be allocated to one ENI.

7. In the pop-up dialog box Allocate IPv6 Address, allocate an IPv6 address to the NIC by automatically allocating or manually filling in. Click OK. The system will allocate an IPv6 address for the ENI, as shown below.
Step 4: Enable Public Network for the ENI's IPv6
- Log in to the Virtual Private Cloud console.
- In the left sidebar, choose IP and NIC > EIPv6.
- Click Adjust Bandwidth under the operation column to set the public network bandwidth and click Adjust.
Note:
If the bandwidth is not set to 0, the public network will be enabled. If it is set to 0, the public network will be disabled.

Step 5: Log In to the CVM and Enable IPv6
CVMs have different operation methods to enable IPv6. This step illustrates the process using the example of newly purchased CentOS 7.5 and CentOS 7.6.
Enabling IPv6 for newly purchased CentOS7.5/CentOS7.6
Go to the CVM console and log in to the instance.

Execute the following command to open the
ifcfg-eth0file in the folder/etc/sysconfig/network-scripts/.vim /etc/sysconfig/network-scripts/ifcfg-eth0Press i to switch to edit mode and add the following content.
DHCPV6C=yes

4. Press Esc and enter :wq to save the file and return.
5. Execute the following commands in sequence to check whether an IPv6 address has been obtained.
dhclient -6
ifconfig

6. Execute the following command to open sshd_config file in the folder /etc/ssh/.
vim /etc/ssh/sshd_config
Press i to switch to edit mode and delete
AddressFamily anycomment (delete the preceding#), and enable IPv6 listening for applications such as ssh.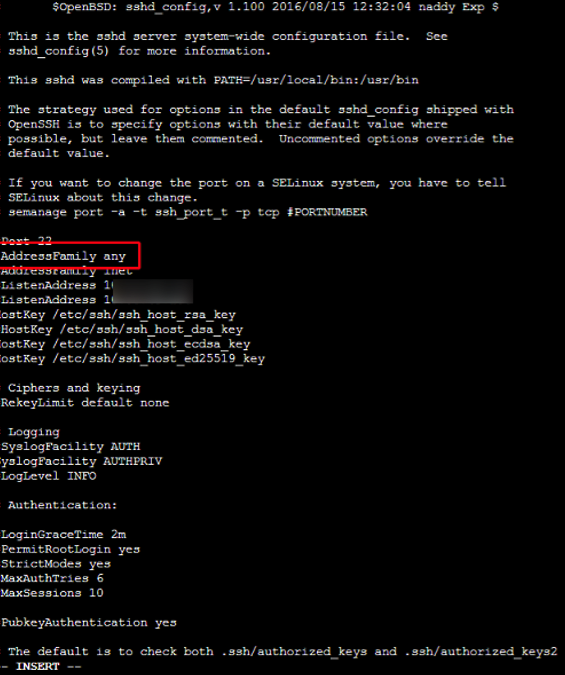
Press "Esc", enter ":wq", to save the file and exit.
Run the following command to restart the SSH process.
service sshd restartRun the following command to check if SSH is now listening on IPv6.
netstat -tupln

Step 6: Test IPv6 Connectivity
Connectivity of IPv6 can be tested via operations such as ping and ssh.
From the CVM
ping6 240c::6666orping6 www.google.com, as shown in the following figure.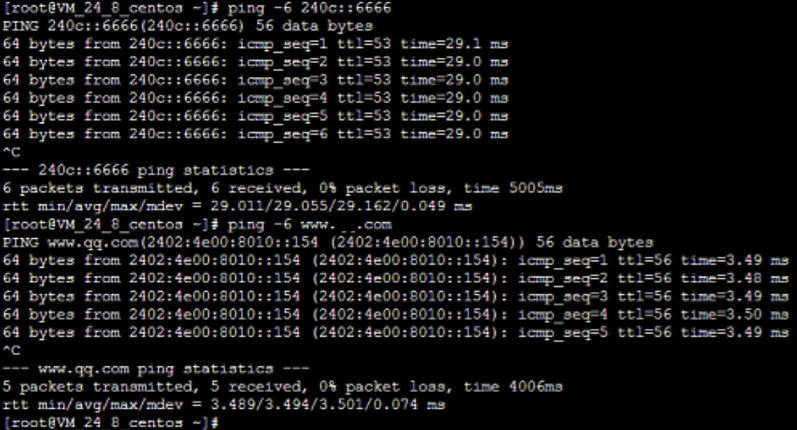
From the public network IPv6 address ssh CVM, and the specific steps are as follows:
Run the following command to view the IPv6 address, and use PuTTY or Xshell and other software to test whether you can use ssh to log in to the CVM through the IPv6 address.ifconfig

The successful result is shown in the figure below.