

In the absence of subnets, when you purchase instances such as CVMs, the system will create a default subnet for you in the corresponding region. The default subnet can help you deploy your business more quickly and save time.
The default subnet has exactly the same features as the subnet you create yourself, and the default subnet does not occupy your quota in a region. If you no longer need the default subnet, you can delete it yourself.
Create a subnet
Users can create one or more subnets at the same time.
- Log in to the Virtual Private Cloud Console.
- Click Subnet in the left sidebar to enter the Management page.
- Click Create and configure the subnet parameters in the pop-up Create Subnet dialog box.
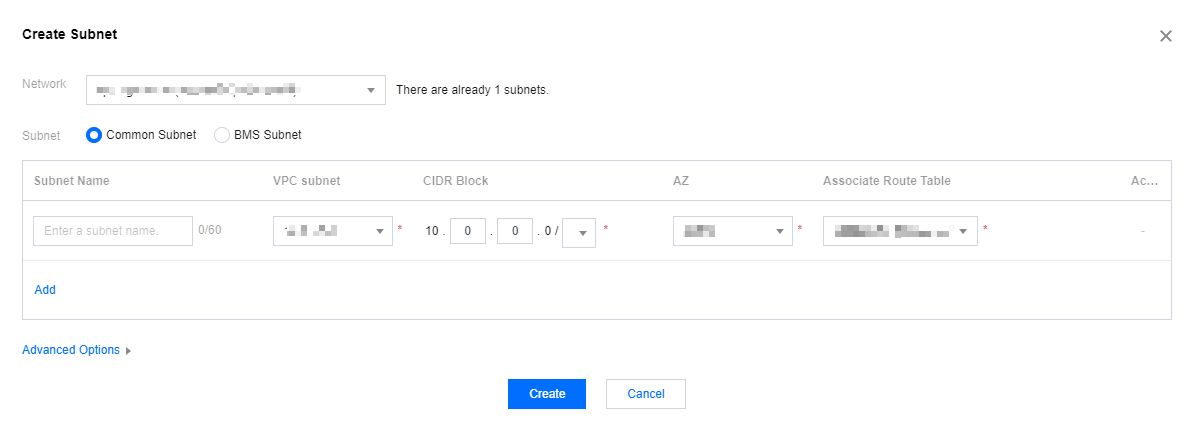
- Network: The VPC where the subnet resides.
- Subnet Name: Enter a custom subnet name within 60 characters.
- VPC subnet: The CIDR block of the selected VPC will be automatically displayed.
- CIDR Block: Set the CIDR block of the subnet (If there are auxiliary CIDRs under the VPC, auxiliary CIDRs can be used to create subnets.). The CIDR of a subnet must be part of the VPC CIDR block and cannot overlap with the CIDR block of other existing subnets under the VPC.
- AZ: Select an availability zone where the subnet resides.
- Associated Route Table: Select a route table to be associated. The subnet must be associated with a route table to control outbound traffic. The default route table of the VPC will be associated by default to ensure private network interconnection in the VPC. You can also select another route table within the VPC.
- Add a Line: Users can create one or more subnets. Click Add a Line to create multiple subnets at a time.
- Advanced Options: You can optionally set tags for the subnet to better manage subnet resources. Click Add to set multiple tags at a time. To delete, click the Delete icon.
- After completing the configurations, click Create. Then subnets that have been successfully created will be displayed in the list.
Adding a CVM to the Subnet
- Log in to the Virtual Private Cloud Console.
- Click Subnet in the left sidebar to enter the Management page.
- Select the target subnet, and click the icon in the CVM column to add a CVM.

- Complete the addition of the CVM instance as instructed on the page.
Modifying the Primary Private IP Addresses of the CVM
You can modify the primary private IP address of the primary ENI, but not that of secondary ENIs. The modification steps are as follows:
- Log in to the Cloud Virtual Machine (CVM) console.
- Click CVM in the left sidebar to enter the CVM Management page.
- In the list, locate the target CVM, click the instance ID, and enter the Details page.
- Select the ENI tab and click
 to expand the primary ENI.
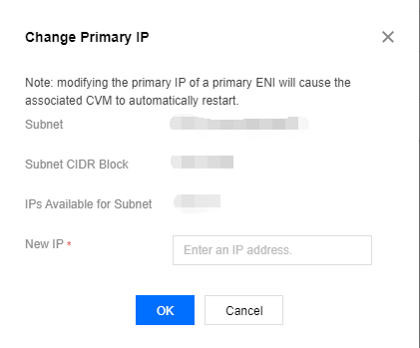
 - In the Action column of the targeted primary private IP addresses, click Modify Primary IP.
- In the pop-up box, enter a new IP address and click OK.
 to expand the primary ENI.
Changing the Subnet Route Table
Each subnet must be associated with a route table to specify the outbound route for the subnet. You can change the route table associated with a subnet in real-time. If you need to create a new route table, see Creating Custom Route Tables.
- Log in to the Virtual Private Cloud Console.
- Click Subnet in the left sidebar to enter the Management page.
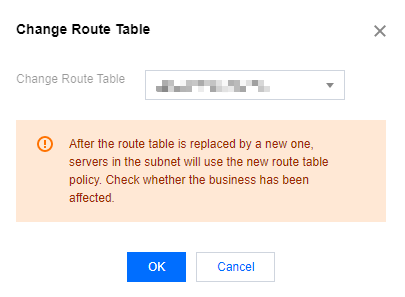
- Click Change Route Table in the Action column on the right side of the subnet that needs to change the route table.

- In the dropdown list, select the route table you want to change to and click OK.
Exporting Subnet Lists
VPC subnets support list export.
- Log in to the Virtual Private Cloud Console.
- Click Subnet in the left sidebar to enter the Management page.
- Click the export icon at the top right of the interface to download the subnet list in ".csv" format to your local machine.

Delete a subnet
Note:
Before deleting a subnet, make sure that the IPs in the subnet are not occupied and that there are no resources (such as CVMs and CDBs) in the subnet.
- Log in to the Virtual Private Cloud Console.
- Click Subnet in the left sidebar to enter the Management page.
- In the list, locate the target subnet, click Delete in the Action column, and confirm the operation.

Allocating and Releasing IPv6 CIDR for a Subnet
Note: The premise for allocating the IPv6 CIDR to a subnet is that the VPC has obtained the IPv6 CIDR.
- Log in to the Virtual Private Cloud Console.
- Click Subnet in the left sidebar to enter the Management page.
- Select a subnet and click Assign IPv6 CIDR. The system will allocate one
/64IPv6 CIDR.
- Select a subnet that needs to release an IPv6 CIDR, click Release IPv6 CIDR, and confirm the operation. The system will reclaim the IPv6 CIDR of that subnet.
