

Creating Network ACL
- Log in to the VPC console.
- In the left directory, click on Security > Network ACL to go to the management page.
- At the top of the list, select the region and VPC, then click on +Create.
- In the pop-up box, enter the name, select the VPC to which it belongs, and click on OK.
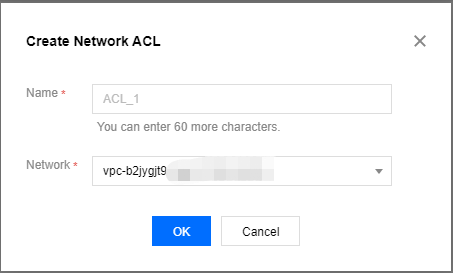
- On the list page, click the corresponding ACL ID to enter the details page where you can add ACL rules and associated subnets.
Adding Network ACL Rules
- Log in to the VPC console.
- In the left directory, click on Security > Network ACL to go to the management page.
- In the list, find the network ACL to be modified and click its ID. The details page is displayed.
- To add an outbound/inbound rule, click on Outbound Rule or Inbound Rule > Edit > Add A Row. Select the protocol type, enter the port and source IP address, and select policy. You can also click on Import Rules to import rules in batches.
- Protocol type: Select the protocol type allowed/denied by ACL rules, such as TCP and UDP.
- Port: the source port of traffic, supporting a single port or port segment, such as 80 or 90-100.
- Source IP: source IP or source IP range of traffic, supporting IP or CIDR, such as
10.20.3.0or10.0.0.2/24. - Policy: Allow or deny.

- Click on Save.
Deleting Network ACL Rules
- Log in to the VPC console.
- In the left directory, click on Security > Network ACL to go to the management page.
- In the list, find the network ACL to be deleted and click its ID. The Basic Information page is displayed.
- Click on the Inbound Rules or Outbound Rules tab to enter the Rule List page.
- Click on Edit to delete the inbound rules in the same steps as that of deleting the outbound rules. This document takes the deletion of inbound rules as an example.
- In the list, find the row of the rule you wish to delete, then click on Delete under the operation column.
At this time, the ACL rule is grayed out. If this deletion is an incorrect operation, you can click on Restore Deletion under the operation column to restore it. - Click on Save to save the above operations.
The deletion or restoration of ACL rules will take effect only after being saved.
Associating Subnet to Network ACL
- Log in to the VPC console.
- In the left directory, click on Security > Network ACL to go to the management page.
- In the list, find the network ACL to be associated with and click its ID. The details page is displayed.
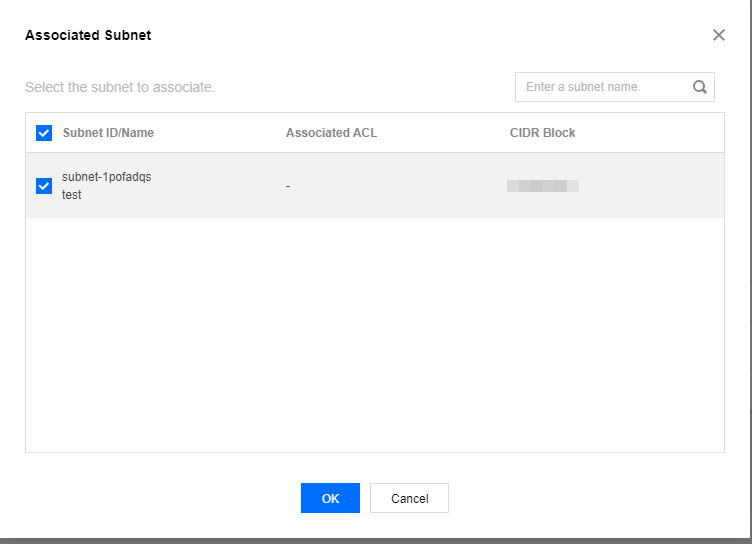
- On the Basic Information page, in the Associated Subnets module, click on Add Association.

- In the pop-up window, select the subnet you want to associate with, and then click on OK.
Disassociating Subnet from Network ACL
- Log in to the VPC console.
- In the left directory, click on Security > Network ACL to go to the management page.
- In the list, find the network ACL to be disassociated and click its ID. The details page is displayed.
- There are the following methods to disassociate subnets:
- Method 1: In the Associate Subnet module on the Basic Information page, find the subnet to be disassociated and click on Unbind.

- Method 2: In the Associated Subnet module on the Basic Information page, check all subnets that need to be disassociated and click on Batch Unbind.
- Method 1: In the Associate Subnet module on the Basic Information page, find the subnet to be disassociated and click on Unbind.
- Click on OK in the pop-up window.
Deleting Network ACL
- Log in to the VPC console.
- In the left directory, click on Security > Network ACL to go to the management page.
- Select the region and the VPC.
- In the list, find the network ACL to be deleted and click its ID. The details page is displayed.
- Click on Delete and confirm the operation to delete this network ACL and all its rules.
If Delete is grayed out, as shown for network ACLtestEgin the image below, it means the network ACL is currently associated with a subnet. You need to disassociate it from the subnet before you can proceed with the deletion.
