

CLB supports TCP/UDP/HTTP/HTTPS protocols and provides flexible forwarding capabilities based on domain names and URL paths. This document describes how to quickly use IPv4 CLB.
Prerequisites
- CLB is only responsible for forwarding traffic and does not have the ability to process requests. Therefore, you need to have CVM instances that handle user requests.
In this example, only two CVM instances are required. You can also plan the number of CVMs yourself. In this example, CVM instancesrs-1andrs-2has been created in the NCR region. - In this document, HTTP forwarding is used for example to illustrate that the corresponding Web server, such as Apache, Nginx, IIS, etc, must be deployed on the CVM.
In the example, Apache is deployed onrs-1to return an HTML page with Hello Tomcat! This is rs-1! and deployed onrs-2to return an HTML page with Hello Tomcat! This is rs-2! in order to verify the results. For more information about CVM deployment, see Deployment of Java Web on Linux (CentOS) and Installment and Configuration of PHP on Windows. - Access the public network IP + path of the CVM. If the displayed result is the page you deployed, it means that the service has been deployed successfully.
Note:
In this example, the service return values deployed by the backend server are different and are only used for feature verification. In practice, to ensure that all users have a consistent experience, exactly the same services are usually deployed on the backend servers.
Create a CLB instance
- log in to Converge Cloud CLB .
- Select a region, click Create, and then enter the Cloud Load Balancer LB window.
- Configure the CLB instance parameters. The configuration example in this document is shown in the figure. Configure according to the actual situation.
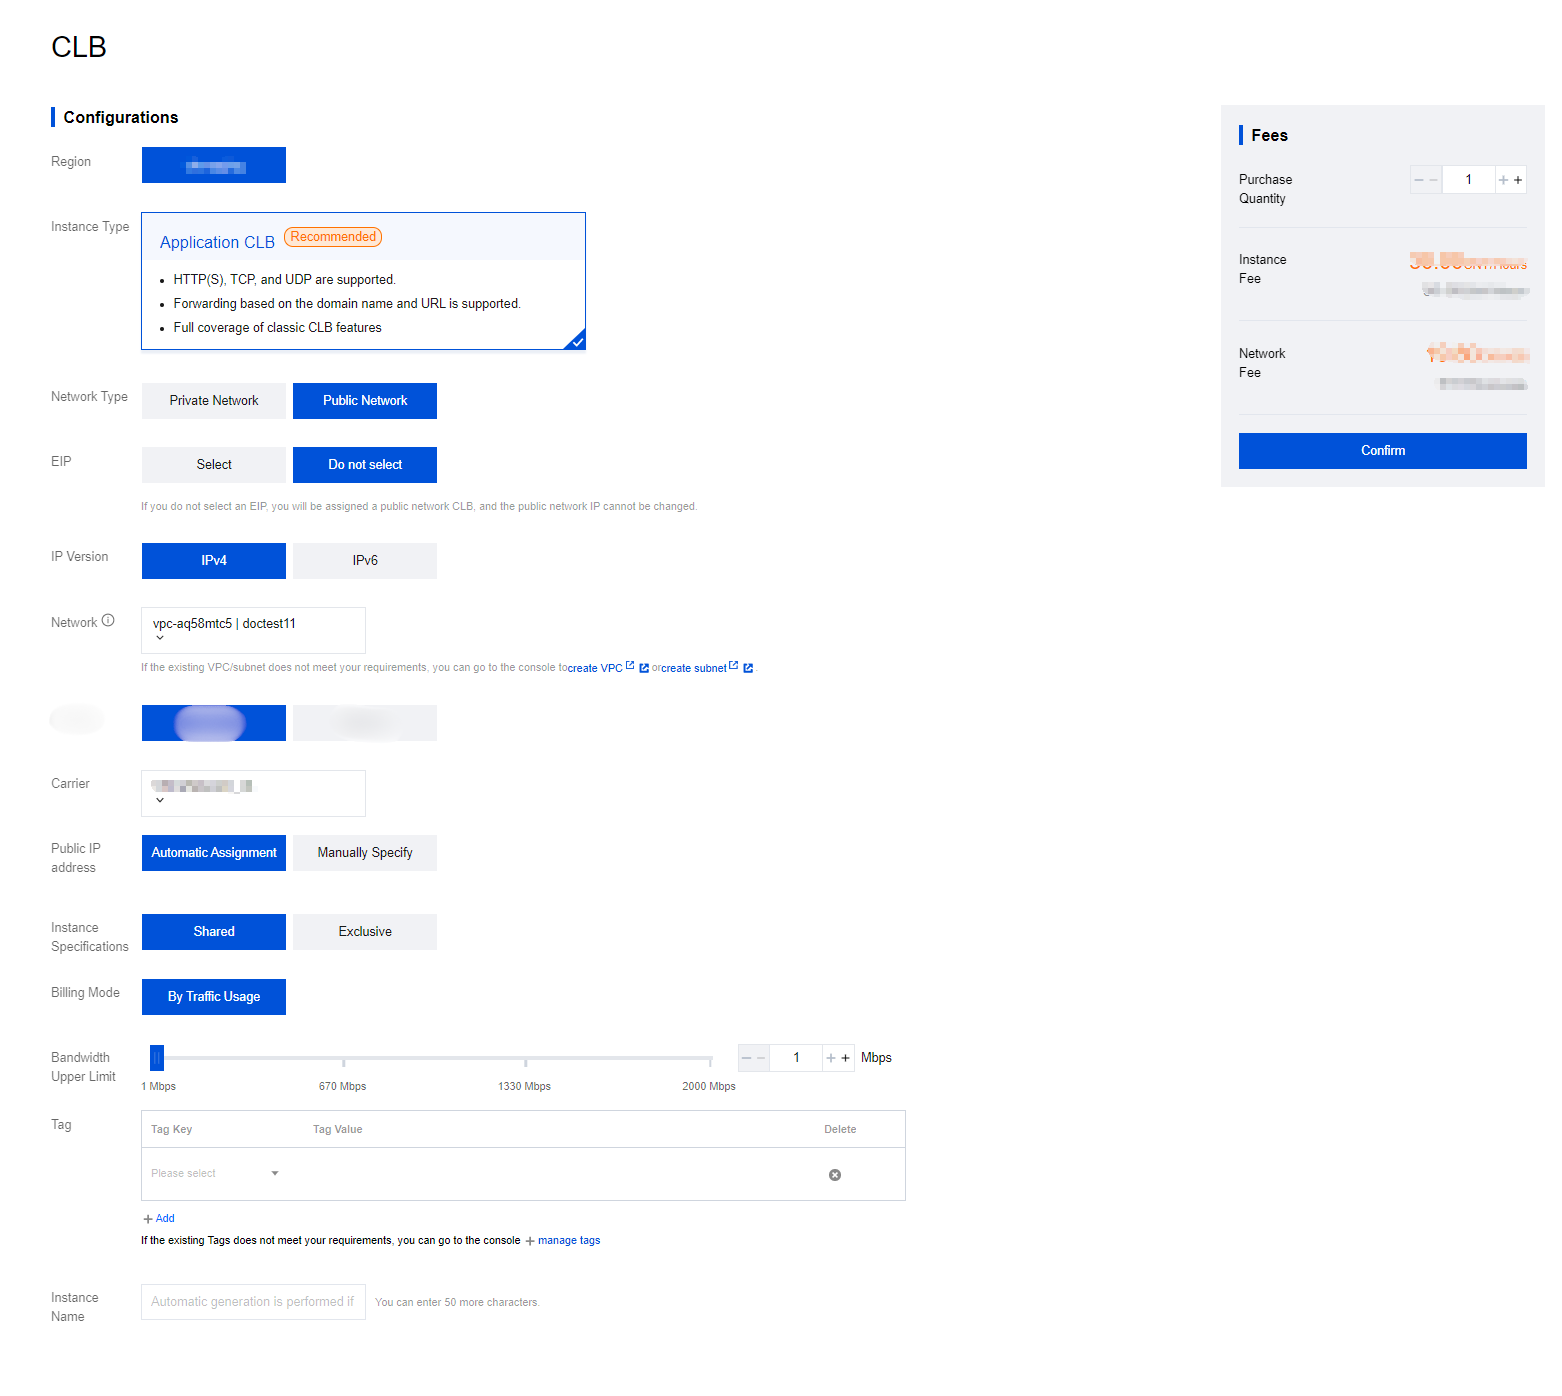
- Click Confirm Activation. After the instance is successfully created, you can see the newly created instance in the list.
Create a CLB listener
The Load Balance Listener is responsible for the actual forwarding by specifying the protocol and port. In this document, the configuration of CLB forwarding the client's HTTP request is used as an example.
Configure HTTP listening protocol and port
- Log in to the cloud console, click Cloud Products > Cloud Computing & Networking > Cloud Load Balancer to open the CLB console.
- In the LB Instance List, find the created CLB instance
clb-testand click the instance ID to open the CLB details page. - In the Basic Info module, you can click the edit icon after the name to modify the instance name.
- In Listener Management, click Create under HTTP/HTTPS Listener to create a new Load Balance Listener.
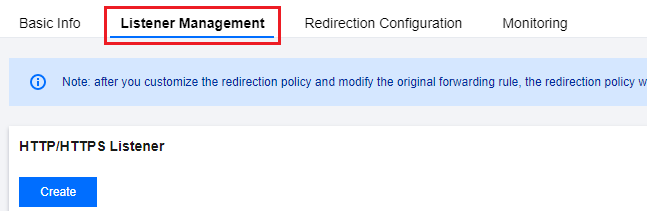
- In the dialog box that pops up, configure the following parameters, and click [Confirm] when done.

| Parameter | Description |
|---|---|
| Name | The name of the listener. In this example, it can be customized as Listener1. |
| Listen Protocol Port | The listener's protocol and listening port. - The listening protocols include HTTP and HTTPS. In this example, HTTP is selected. - The listening port is used to receive requests and forward them to the backend server. The port range is 1 - 65535. Among them, ports 843, 1,020, 1,433, 1,434, 3,306, 3,389, 6,006, 20,000, 36,000, 42,222, 48,369, 56,000, and 65,010 are reserved for the system and are not open to the public yet. - The listening ports in the same CLB instance cannot be repeated. |
| Default Domain Name | You can choose to enable or disable it. - Enable: When the client request does not match any domain name of this listener, CLB will forward the request to the default domain name (Default Server). Each listener can only be configured with one default domain name. - If your Layer-7 listener has been configured with a default domain name, client requests that do not match other rules will be forwarded to the default domain name. - If your Layer-7 listener is not configured with a default domain name, client requests that do not match other rules will be forwarded to the first domain name loaded by the CLB. Since the loading order may be inconsistent with the console configuration order, it is not necessarily the first one configured by the console. - Disable: When the client request does not match any domain name of this listener, the request will not be forwarded. |
Configuring the forwarding rules for the listener
- In "Listener Management", select the newly created listener Listener1, click +, and start adding rules.
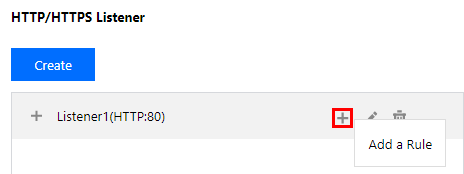
- In the forwarding rule dialog box that pops up, set basic configuration information such as domain name, URL path, and balancing method, and click next step: Health Check.
- Domain name: the domain name used by your backend service. In this example,
www.qcloudtest.comis used. Domain name supports wildcards. For details, see Configuration Instructions. - URL Path: the access path of your backend service. In this example,
/image/is used. - Select Polling by Weight for the balance mode.
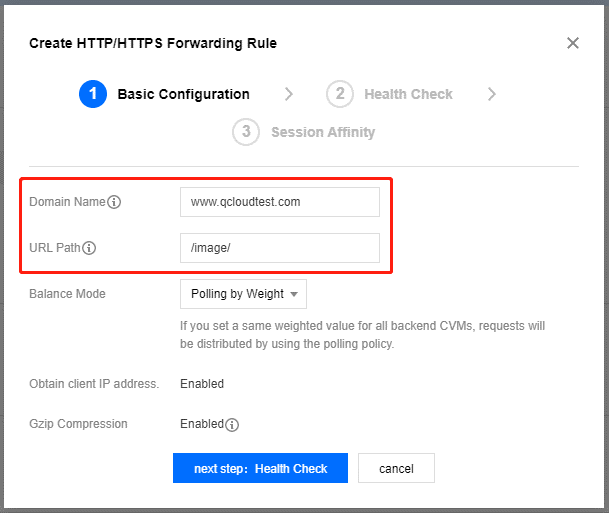
- Domain name: the domain name used by your backend service. In this example,
- Configuring health check: Enable health check, check whether the domain name uses default forwarding domain name and forwarding path, and click next step: Session Affinity.
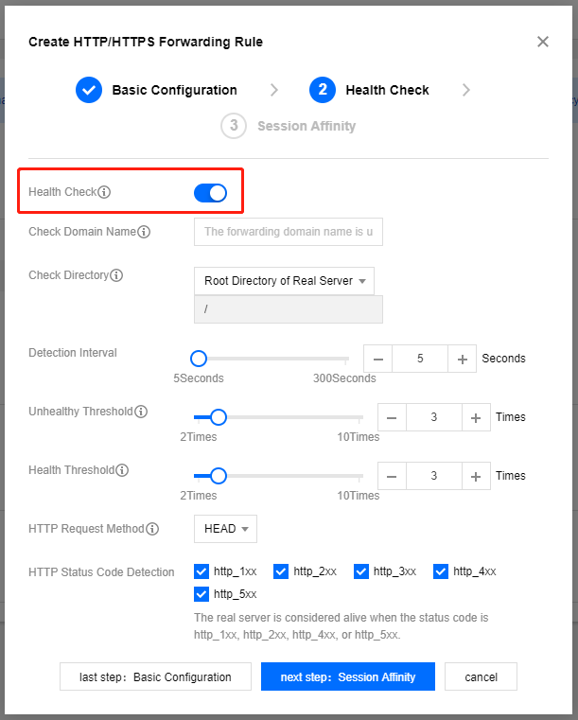
| Parameter | Description |
|---|---|
| Health Check | You can either enable or disable the health check feature. We recommend you to enable health check. It can help you automatically check and remove abnormal backend CVM ports. |
| Check Domain Name | Health check domain name: - Length limit: 1 to 80 characters. - The request domain is set to the forwarding domain by default. - Regular expressions are not supported. When your forwarding domain name is a wildcard name, you need to specify a fixed domain (non-regular) name as the health check domain name. - The supported character set is a to z, 0 to 9, ., and -. |
| Check Directory. | The health check path can be set to the backend server root directory or a specified URL: - Length limit: 1 to 200 characters. - The default is / and must start with /. - Regular expressions are not supported. We recommend you to specify a fixed URL path (static page) for health check. - The supported character set is: a to z, A to Z, 0 to 9, ., -, _, /, =, and ?. . |
| Detection Interval | - The interval for the CLB health check. - Configurable range: 5 - 300 seconds. |
| Unhealthy Threshold | - If the health check results received for n (a value filled in) consecutive times fail, it is identified as unhealthy and the console displays it as an exception. - Configurable range: 2 - 10 times. |
| Health Threshold | - If the health check results received for n (a value filled in) consecutive times are successful, it is identified as healthy and the console displays it as healthy. - Configurable range: 2 - 10 times. |
| HTTP Request Method | HTTP request method for the health checks, optional: GET or HEAD, the default is GET. - If the HEAD method is used, the server only returns the HTTP header information, which can reduce backend overhead and improve request efficiency. The corresponding backend service must support HEAD. - If the GET method is used, the backend service only needs to support GET. |
| Normal Status Code | When the status code is the selected status code, the backend server is considered alive, that is, the health check is normal. Optional codes: http_1xx, http_2xx, http_3xx, http_4xx and http_5xx. You can select multiple status codes. |
Session Affinity: Enable session affinity, set the persistence time, and click Submit to complete the configuration of the listener forwarding rule.
For more information about Load Balance Listener, see Load Balance Listener Overview.
Note:
- One listener (i.e. listening protocol: port) can be configured with multiple domain names, and one domain name can be configured with multiple URL paths. Select the listener or domain names and click the + sign to create a new rule.
- Session persistence: If the user disables session persistence and select round-robin scheduling, requests will be allocated to different backend servers in turn. If the user enables session persistence, or disables session persistence and selects IP Hash scheduling, requests will be continuously allocated to the same backend server.
>
Binding Cloud Virtual Machine (CVM)
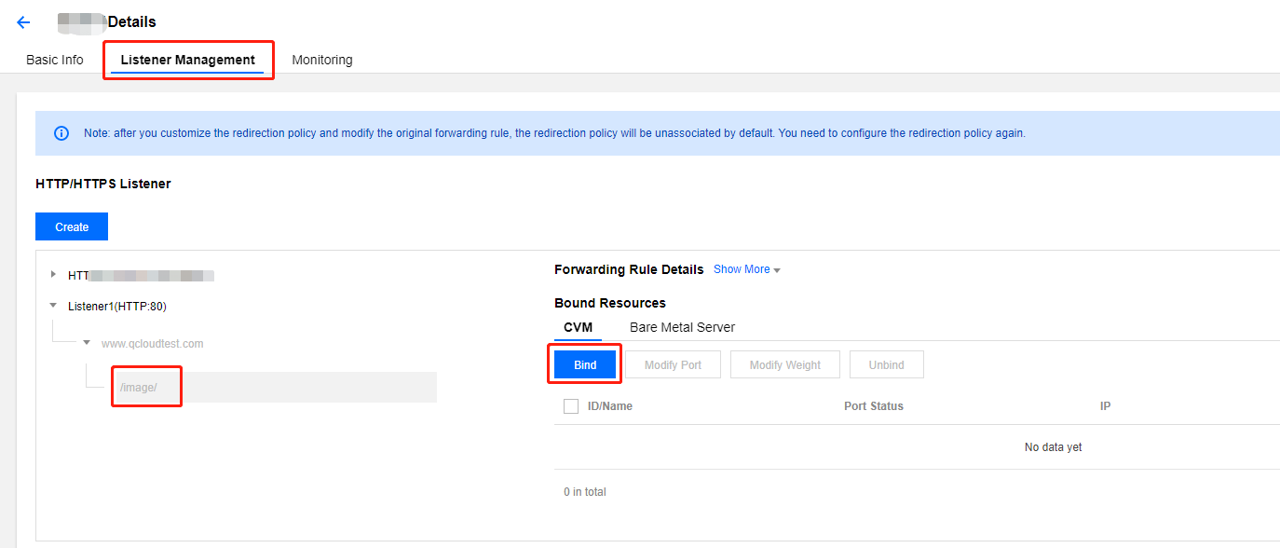
On the Listener Management page, select the triangle icon next to the newly created listener to expand Listener1. Select and expand the domain name and URL path in turn. The information of CVM bound to the URL path is displayed on the right side of the screen. Click Bind.
In the pop-up box, select the CVM instances
rs-1andrs-2in the same region as the CLB. Set the CVM ports to 80 and the CVM weights to the default value 10.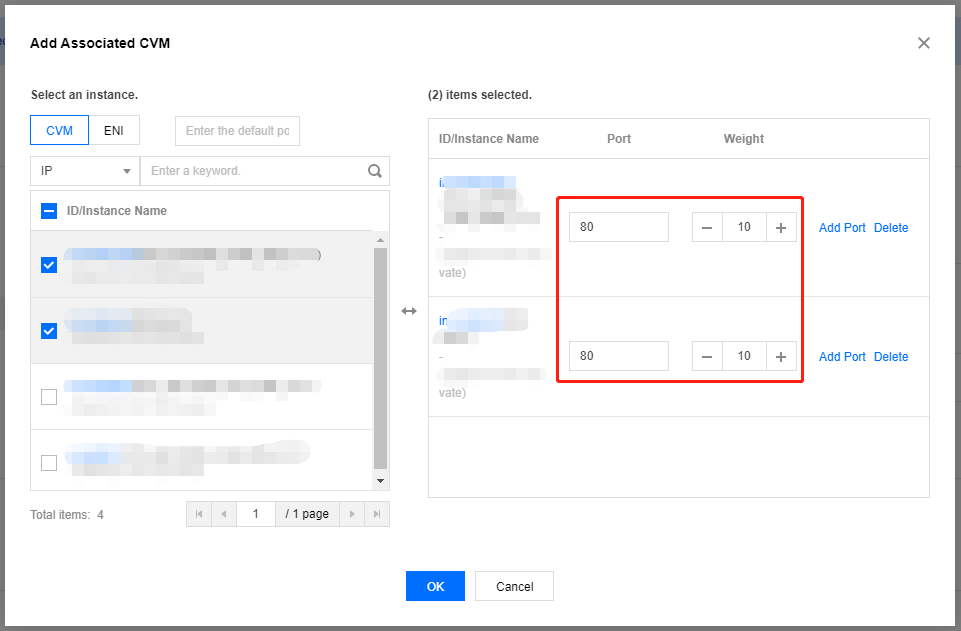
Click OK to complete binding.
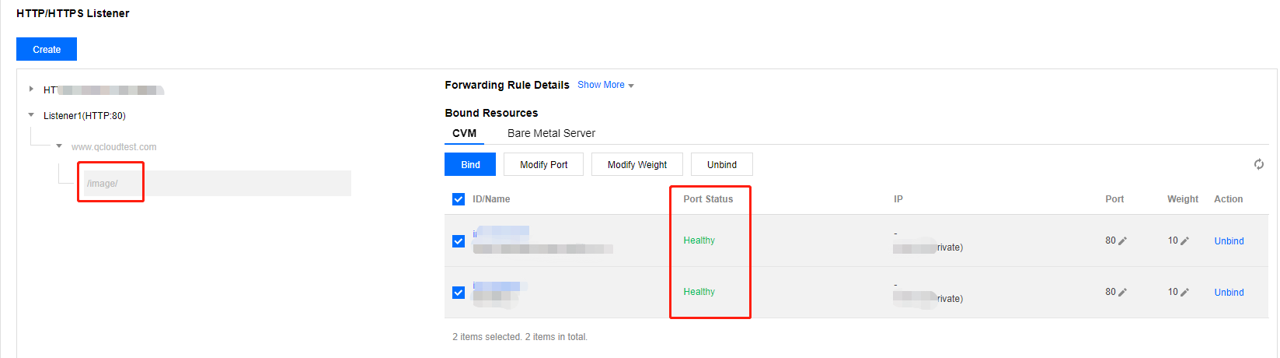
Expand the listener to the URL path dimensionality to view the bound CVM and its health check status. When the status is healthy, it means that the CVM can normally process the requests forwarded by the CLB.
Note:
One forwarding rule (listening protocol + port + domain name + URL path) can bind multiple ports of the same CVM. If the user deploys the same service in ports
80and81ofrs-1, the CLB supports the forwarding rules in the example binds ports80and81ofrs-1at the same time, and both ports will receive the request forwarded by CLB.
Verifying the CLB Service
After you configure CLB, you can verify whether the architecture is effective, that is, verify different backend CVMs are accessed through different domain names + URLs under a CLB instance, or, verify content-based routing feature.
Method 1: Configuring hosts to point the domain name to CLB
- On a Windows system, go to the directory
C:\Windows\System32\drivers\etc, modify the hosts file, and map the domain name to the VIP of the CLB instance.
- To verify whether the hosts are configured successfully, you can run cmd and use the ping command to check whether the domain name is successfully bound to the VIP. If there is a data packet, the binding is successful.
- Enter the access path
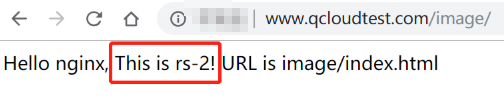
http://www.qcloudtest.com/image/in the browser to test the CLB service. As shown in the following figure, the request has been forwarded by CLB to the CVM rs-1, and the CVM processed and returned the request normally.
- The round-robin scheduling algorithm of this listener is Weighted Round Robin, and the weights of the two CVMs are both 10. Refresh the browser and send the request again. You can see that this request has been forwarded by CLB to the CVM rs-2.
Note:
The
/inimage/must be retained. It indicates that image is the default directory, not a file name.
Method 2: Configuring DNS to point the domain name to CLB
- Log in to the cloud console and click Cloud Products > Domain Name Services > VPCDNS.
- Click the Domain Name you purchased, click the Add Record button on the Domain DNS Management page, add an A record for the domain, and enter the following content:
- Record type:
A record. - Host record: This is the domain name prefix. In this example, to resolve all prefixes, set it to
*.qcloudtest.com. - Record value: Enter the CLB IP address here.
- Weight: Set this to its default value 100.
- Record type:
- After addition, click OK.
It takes some time for DNS to propagate the record across the Internet. To test whether the domain name is resolved normally, you can directly access the bound CNAME domain name (such aswww.qcloudtest.comin this example) after the DNS record for a period of time to verify CLB.