

Overview
When using the CVM operating system, if the machine grub boot file is lost, key system files are missing, and lib dynamic library files are damaged or missing, the operating system may fail to enter the single-user mode and complete the repair. In this case, you need to use the CVM rescue mode to repair the system. This document describes how to use the rescue mode through the CVM console.
Directions
Enter Rescue Mode
Note:
Before you enter rescue mode, it is strongly recommended that you back up the instance to prevent any impact caused by misoperation. Cloud Block Storage can be backed up via Create Snapshots, and local system disks can be backed up via Create Custom Images.
- Log in to the CVM console.
- In the Action column of the instance for which you want to enter rescue mode, click More > Operation and Detection > Enter Rescue Mode.
- In the Enter Rescue Mode page that pops up, enter the instance login password and confirm the password, then click OK.
If the instance is in the running state, you need to check the Force Shutdown option before clicking OK.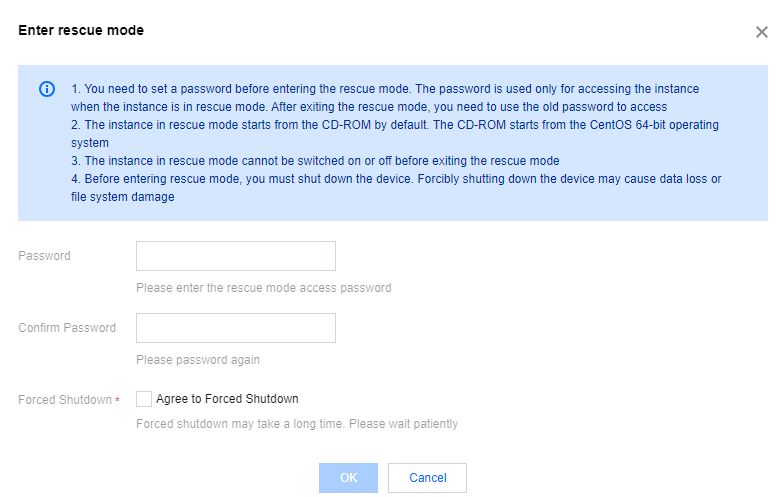
- After the rescue mode is entered, the status of the CVM list is displayed as Rescue Mode and multiple functions in the Action column are grayed out, with a prompt Instance (instance ID) that does not support rescue mode.
Exit Rescue Mode
- After the instance is repaired, click More > Operation and Detection > Exit Rescue Mode in the Operation column.
- Read the prompts carefully, then click OK. After the CVM list is entered, the status displays Exiting rescue mode.
- Wait for a while and the status changes to Running, indicating that the rescue mode has been exited successfully. Other operations can be performed normally.