

Scenarios
To run on the cloud platform normally, a Cloud Virtual Machine (CVM) should have a kernel supporting virtio drivers (including the block device driver virtio_blk and the NIC driver virtio_net). To prevent a created CVM instance from failing to start normally after importing a custom image, you need to check whether it is required to check and fix the support for virtio drivers in the source server before importing the image. This document uses the CentOS operating system as an example to describe how to check and fix the support for virtio drivers in an image before you import the image.
Operation Steps
Step 1: Check Whether the Kernel Supports Virtio Driver
Execute the following command to check whether the current kernel supports the Virtio driver.
grep -i virtio /boot/config-$(uname -r)
The result resembles the following is returned:
- If the values of the CONFIG_VIRTIO_BLK parameter and the CONFIG_VIRTIO_NET parameter are m in the returned result, execute Step 2.
- If the values of the CONFIG_VIRTIO_BLK parameter and the CONFIG_VIRTIO_NET parameter are y in the returned result, it means that the operating system contains the virtio drivers. You can directly import the custom image to the cloud platform. For detailed operations, see Overview of Importing an Image.
- If there is no information about the CONFIG_VIRTIO_BLK parameter and the CONFIG_VIRTIO_NET parameter in the returned result, it means that the operating system does not support importing images to the cloud platform. Please download and compile the kernel.
Step 2: Check Whether the Temporary File System Contains the Virtio Driver
If the value of the parameters is m in the execution result of Step 1, you need to further check and confirm whether the temporary file system initramfs or initrd contains the virtio drivers. Execute the corresponding command according to the operating system:
CentOS Stream operating system:
lsinitrd /boot/initramfs-$(uname -r).img | grep virtio
CentOS 6/CentOS 7/CentOS 8/RedHat 6/RedHat 7 operating systems:
lsinitrd /boot/initramfs-$(uname -r).img | grep virtio
RedHat 5/CentOS 5 operating systems:
mkdir -p /tmp/initrd && cd /tmp/initrdzcat /boot/initrd-$(uname -r).img | cpio -idmvfind . -name "virtio*"
Debian/Ubuntu operating systems:
lsinitramfs /boot/initrd.img-$(uname -r) | grep virtio
OpenSUSE Leap operating system:
lsinitrd /boot/initrd-$(uname -r) | grep virtio
The result resembles the following is returned:

It can be seen that initramfs already contains the virtio_blk driver, as well as virtio.ko, virtio_pci.ko, and virtio_ring.ko on which the driver depends. In this case, you can directly import the custom image to the cloud platform. For detailed operations, see Overview of Importing an Image. If initramfs or initrd does not contain the virtio drivers, execute Step 3.
Step 3: Reconfigure the Temporary File System
If the execution result of Step 2 shows that the temporary file system initramfs or initrd does not contain the virtio drivers, you need to reconfigure the temporary file system initramfs or initrd to ensure that it contains the virtio drivers. Please select the corresponding operation according to the operating system:
CentOS Stream operating system:
mkinitrd -f --allow-missing --with=virtio_blk --preload=virtio_blk --with=virtio_net --preload=virtio_net --with=virtio_console --preload=virtio_console /boot/initramfs-$(uname -r).img $(uname -r)
CentOS 8/RedHat 8 operating system:
mkinitrd -f --allow-missing --with=virtio_blk --preload=virtio_blk --with=virtio_net --preload=virtio_net --with=virtio_console --preload=virtio_console /boot/initramfs-$(uname -r).img $(uname -r)
CentOS 6/CentOS 7/RedHat 6/RedHat 7 operating systems:
mkinitrd -f --allow-missing --with=xen-blkfront --preload=xen-blkfront --with=virtio_blk --preload=virtio_blk --with=virtio_pci --preload=virtio_pci --with=virtio_console --preload=virtio_console /boot/initramfs-$(uname -r).img $(uname -r)
RedHat 5/CentOS 5 operating systems:
mkinitrd -f --allow-missing --with=xen-vbd --preload=xen-vbd --with=xen-platform-pci --preload=xen-platform-pci --with=virtio_blk --preload=virtio_blk --with=virtio_pci --preload=virtio_pci --with=virtio_console --preload=virtio_console /boot/initrd-$(uname -r).img $(uname -r)
Debian/Ubuntu operating systems:
echo -e 'xen-blkfront\nvirtio_blk\nvirtio_pci\nvirtio_console' >> /etc/initramfs-tools/modulesmkinitramfs -o /boot/initrd.img-$(uname -r)
OpenSUSE Leap operating system:
mkinitrd -m "virtio_blk virtio_net"
Appendix
Downloading and Compiling the Kernel
Downloading the Kernel Installation Package
- Execute the following command to install the components necessary for kernel compilation.
yum install -y ncurses-devel gcc make wget
- Execute the following command to query the version of the kernel currently used by the system.
uname -r
A result similar to the following will be returned. The version of the kernel used by the current system is 2.6.32-642.6.2.el6.x86_64.

3. Go to the Linux kernel download page and download the source code of the corresponding or closest kernel version. For example, for the kernel version 2.6.32-642.6.2.el6.x86_64, download the installation package linux-2.6.32.tar.gz. Its download path is https://mirrors.edge.kernel.org/pub/linux/kernel/v2.6/linux-2.6.32.tar.gz.
4. Execute the following command to switch the directory.
cd /usr/src/
- Execute the following command to download the installation package.
wget https://mirrors.edge.kernel.org/pub/linux/kernel/v2.6/linux-2.6.32.tar.gz
- Execute the following command to decompress the installation package.
tar -xzf linux-2.6.32.tar.gz
- Execute the following command to establish a connection.
ln -s linux-2.6.32 linux
- Execute the following command to switch the directory.
cd /usr/src/linux
Compile the kernel.
- Execute the following commands in sequence to compile the kernel.
make mrproper
cp /boot/config-$(uname -r) ./.config
make menuconfig
Go to the Linux Kernel vX.X.XX Configuration interface.
If you cannot go to the Linux Kernel vX.X.XX Configuration interface, please execute Step 18. On the Linux Kernel vX.X.XX Configuration interface:
- Press Tab or the ↑/↓ key to move the cursor.
- Press Enter to select or execute the item selected by the cursor.
- Press the space bar to select the item selected by the cursor. "*" means compiling to the kernel, and "M" means compiling to a module.
- Press the ↓ key to move the cursor to Virtualization and press the space bar to select Virtualization.
- Press Enter at Virtualization to go to the Virtualization details interface.
- On the Virtualization details interface, confirm whether the Kernel-based Virtual Machine (KVM) support option is selected, as shown in the figure below:
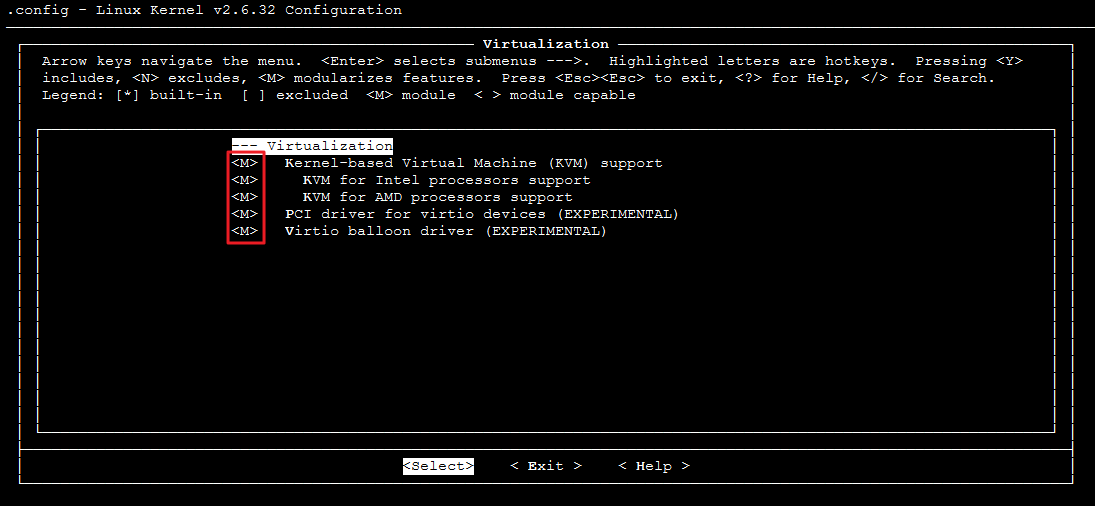
If it is not selected, press the space bar to select the Kernel-based Virtual Machine (KVM) support option.
5. Press Esc to return to the Linux Kernel vX.X.XX Configuration main interface.
6. Press the ↓ key to move the cursor to Processor type and features, and press Enter to go to the Processor type and features details interface.
7. Press the ↓ key to move the cursor to Paravirtualized guest support and press Enter to go to the Paravirtualized guest support details interface.
8. On the Paravirtualized guest support details interface, confirm whether KVM paravirtualized clock and KVM Guest support are selected.
If they are not selected, press the space bar to select the KVM paravirtualized clock and KVM Guest support options.
9. Press Esc to return to the Linux Kernel vX.X.XX Configuration main interface.
10. Press the ↓ key to move the cursor to Device Drivers and press Enter to go to the Device Drivers details interface.
11. Press the ↓ key to move the cursor to Block devices and press Enter to go to the Block devices details interface.
12. On the Block devices details interface, confirm whether Virtio block driver (EXPERIMENTAL) is selected.
If it is not selected, press the space bar to select the Virtio block driver (EXPERIMENTAL) option.
13. Press Esc to return to the Device Drivers details interface.
14. Press the ↓ key to move the cursor to Network device support and press Enter to go to the Network device support details interface.
15. On the Network device support details interface, confirm whether Virtio network driver (EXPERIMENTAL) is selected.
If it is not selected, press the space bar to select the Virtio network driver (EXPERIMENTAL) option.
16. Press Esc to exit the kernel configuration interface, and select YES to save the .config file according to the pop-up prompt.
17. See Step 1: Check whether the kernel supports the virtio drivers, and verify whether the virtio drivers have been configured correctly.
18. (Optional) Execute the following command to manually edit the .config file.
It is recommended that you perform this operation if you meet either of the following conditions:
- After checking, you find that there is still no related configuration information about the virtio drivers in the kernel.
- When compiling the kernel, you cannot go to the kernel configuration interface or fail to save the
.configfile successfully.
make oldconfig
make prepare
make scripts
make
make install
- Execute the following command in sequence to view the installation of the virtio drivers.
find /lib/modules/"$(uname -r)"/ -name "virtio.*" | grep -E "virtio.*"
grep -E "virtio.*" < /lib/modules/"$(uname -r)"/modules.builtin
If the returned result of any of the command outputs a list of files such as virtio_blk, virtio_pci, and virtio_console, it means that you have installed the virtio drivers correctly.