Linux Single-User Mode Guide
Overview
Linux users sometimes need to enter single-user mode to perform operations such as password recovery, fixing sshd issues, or system maintenance. This document describes how to enter single-user mode for mainstream Linux distributions.
Determining the Operating System
Follow the steps corresponding to your Linux distribution.
Logging in to the CVM via VNC
- Log in to the CVM console.
- On the instance management page, select the instance you want to log in to and click Log In.
- In the pop-up Log in to Windows/Linux Instance window, select Other methods (VNC) and click Log in now.
- In the login window that pops up, select Send Remote Command in the upper left corner and use the interface to access the login screen.
VNC login is required because single-user mode changes boot parameters and normal SSH or remote login may not work.
CentOS 6
CentOS 6 uses GRUB. The steps below are based on CentOS 6.9. Actual steps may vary slightly with different versions.
- Log in to the CVM.
- Open the GRUB configuration file:
vi /etc/grub.conf
Press i to enter the edit mode.
Find the waiting time parameter "GRUB-TIMEOUT" of the default startup item, and modify its value to the required time range according to actual needs.
The default value of "GRUB-TIMEOUT” is 5 seconds. In order to avoid not being able to see the boot interface due to a short waiting time, it is recommended to adjust it to 60 seconds or more. > Note: This item affects the system startup time. After completing the configuration, you need to modify it back to the default value.Press Esc to exit the edit mode, enter :wq, and press Enter.
Save the settings and exit the VI editor.Run the following command to restart the CVM.
rebootWait for about 1 minute and log in to the CVM instance through the VNC. The login interface is shown below:

Press any key to enter the menu. As shown below:
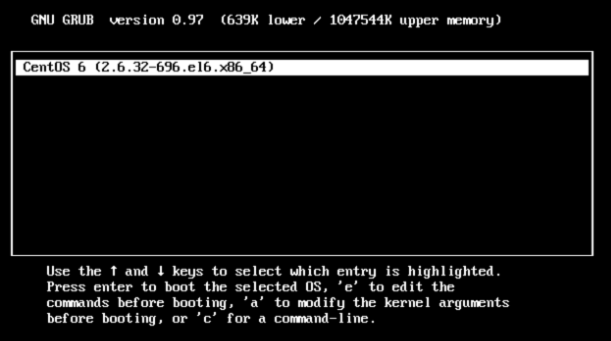
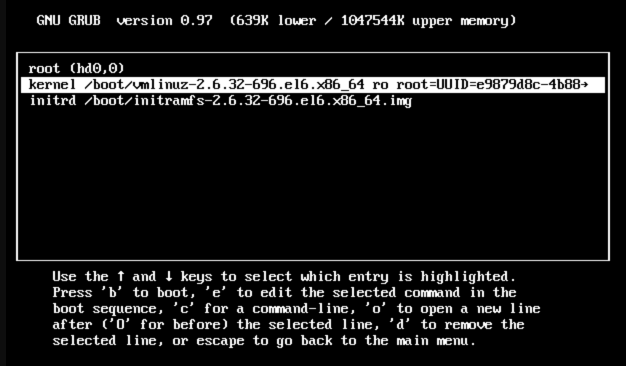
Press e to enter the kernel editing interface and enter single. As shown below:

Press Enter. As shown below:
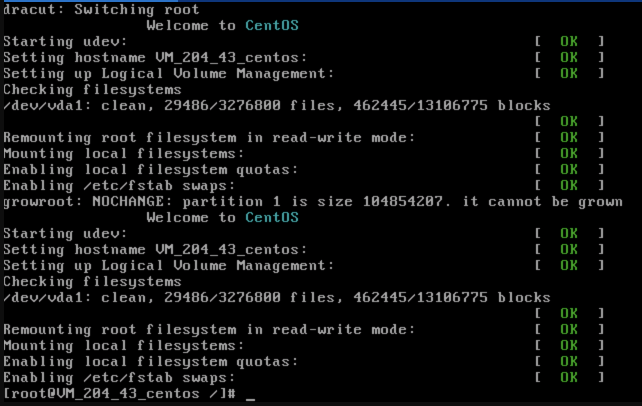
In the interface shown below, press b to enter the single-user mode.
Run the following command to exit the single-user mode.
exec /sbin/init
CentOS 7
Unlike CentOS 6, CentOS 7 and later versions use GRUB 2. The following steps are based on CentOS 7.5 as an example. The detailed steps may vary slightly depending on the version of the operating system.
Log in to the CVM.
Run the following command to open the
/etc/default/grubfile.vi /etc/default/grubPress i to enter the edit mode.
Find the waiting time parameter "GRUB-TIMEOUT” of the default startup item, and modify its value to the required time range according to actual needs. As shown below:
The default value of “GRUB_TIMEOUT" is 5 seconds. In order to avoid not being able to see the boot interface due to a short waiting time, it is recommended to adjust it to 60 seconds or more.Note: This item affects the system startup time. After completing the configuration, you need to modify it back to the default value.

5. Press Esc to exit the edit mode, enter :wq, and press Enter.
Save the settings and exit the VI editor.
6. Run the following command to recompile and generate the grub.cfg file.
grub2-mkconfig -o /boot/grub2/grub.cfg
The returned result is as shown in the following figure:
7. Run the following command to restart the CVM.
reboot
- Wait for about 1 minute and log in to the CVM instance through the VNC. The login interface is shown below:
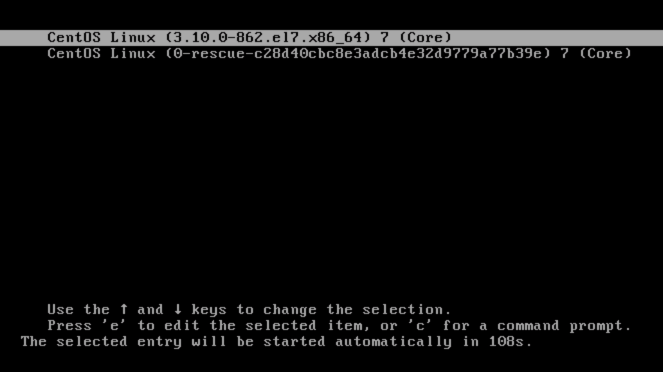
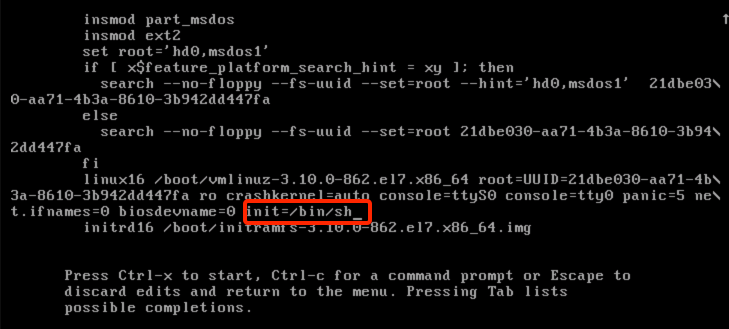
- Press e to enter the kernel editing interface and add init=/bin/sh to the red box. As shown below:
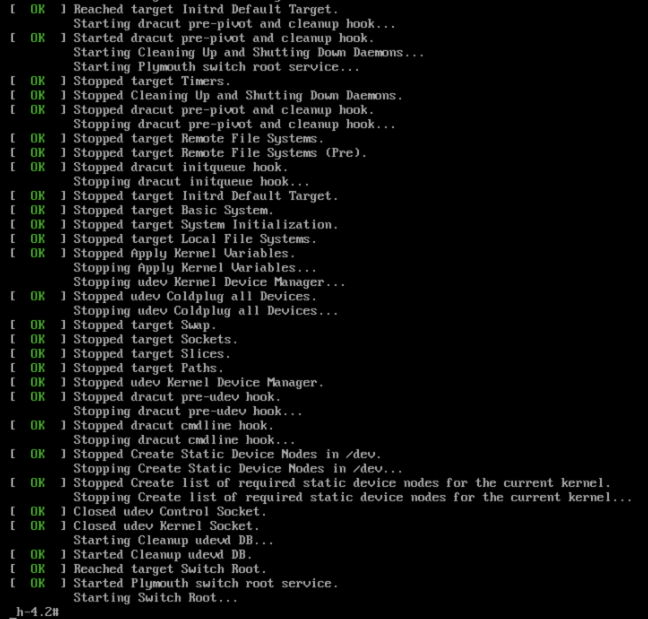
- Press Ctrl+X to boot into the single-user mode. As shown below:
- Run the following command to exit the single-user mode.
exec /sbin/init
Ubuntu
The following steps are based on Ubuntu 16.04 as an example. The detailed steps may vary slightly depending on the version of the operating system.
Log in to the CVM.
Run the following command to open the
/etc/default/grubfile.sudo vi /etc/default/grubPress i to enter the edit mode.
Find the waiting time parameter "GRUB-TIMEOUT” of the default startup item, and modify its value to the required time range according to actual needs. As shown below:
The default value of “GRUB_TIMEOUT" is 5 seconds. In order to avoid not being able to see the boot interface due to a short waiting time, it is recommended to adjust it to 60 seconds or more. > Note: - This affects the system's start time. After completing the configuration, it should be reverted to the default value.
- The default account in Ubuntu is not root. Please remember to use the sudo command.

5. Press Esc to exit the edit mode, enter :wq, and press Enter.
Save the settings and exit the VI editor.
6. Run the following command to recompile and generate the grub.cfg file.
sudo update-grub
The returned result is as shown in the following figure:
7. Run the following command to restart the CVM.
sudo reboot
- Wait for about 1 minute and log in to the CVM instance through the VNC. The login interface is shown below:
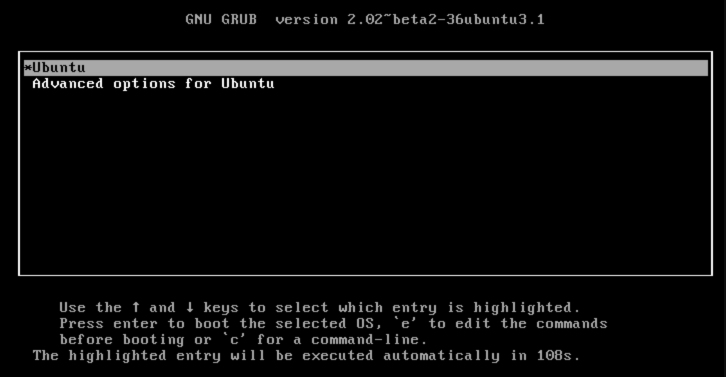
- Press e to enter the kernel editing interface and add rw single init=/bin/bash to the red box. As shown below:
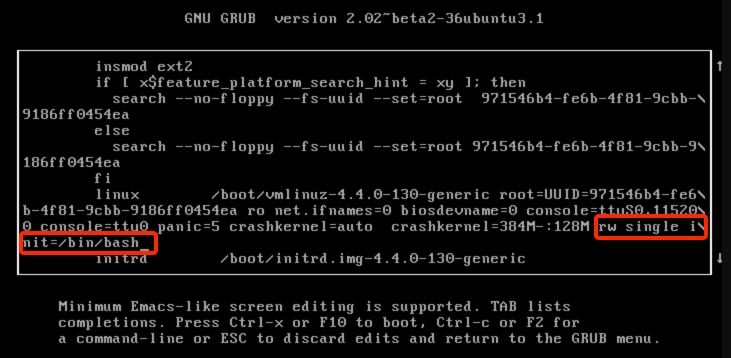
- Press Ctrl+X to boot into the single-user mode. As shown below: