

Overview
Security identifiers (SIDs) are used in Microsoft operating systems to identify computers and users. Due to the same SIDs of CVM instances produced based on the same image, it may cause the problem of being unable to join the domain. If you need to build a Windows domain environment, you need to modify the SIDs to join the domain.
This document takes the Windows Server 2012 operating system CVM as an example to describe how to use the system's built-in sysprep and sidchg tools to modify the SIDs.
These notes apply only to Windows Server 2008 R2, Windows Server 2012, and Windows Server 2016. If you need to modify SIDs in batches, you can create a custom image (select Execute sysprep to Create an Image). Modifying SIDs may cause data loss or system damage. It is recommended to prepare a system disk snapshot or image in advance.
Operation Methods
Modifying SIDs Using sysprep
After the SIDs are modified using sysprep, many system parameters, including IP configuration information, will be reset, and you must manually reset them. C:\Users\Administrator will also be reset, and some data on the system disk will be cleared. Make sure to back up your data in advance.
Log in to the CVM through VNC.
On the operating system interface, right-click
 Run, enter cmd, and press Enter to open CMD as an administrator.
In the administrator command line, execute the following command to save the current network configurations.
ipconfig /allIn the administrator command line, execute the following command to open the sysprep tool.
C:\Windows\System32\Sysprep\sysprep.exeIn the opened [System Preparation Tool 3.14] window, make the following settings.
- Set System Cleanup to Enter the System Out-of-box Experience (OOBE) and select General.
- Set Shutdown Options to Restart.
Click OK and the system will restart automatically.
After the startup is complete, follow the wizard to complete the configurations (by selecting the language, resetting the password, etc.).
On the operating system interface, right-click
Run, enter cmd, and press Enter to open CMD as an administrator.Run the following command to verify whether the SIDs have been modified.
whoami /userIf the following information is returned, it indicates that the SIDs have been modified.
According to the network configuration information saved in Step 3, reset the network interface information (such as IP address, gateway address, DNS, etc.).
 Run, enter cmd, and press Enter to open CMD as an administrator.
Modifying SIDs Using sidchg
Log in to the CVM.
Access and download the sidchg tool through IE browser.
Download address of sidchg tool:http://www.stratesave.com/html/sidchg.htmlUsing the administrator command line, run the following command to open the sidchg tool.
For example, if the sidchg tool is stored in the C: drive, its name is sidchg64-2.0p.exe.
Where,/Rindicates automatic restart after modification, and/Sindicates shutdown after modification. For details, refer to SIDCHG Official Manuals.According to the interface prompts, enter license key or trial key, and press Enter.
According to the interface prompts, enter Y and press Enter.
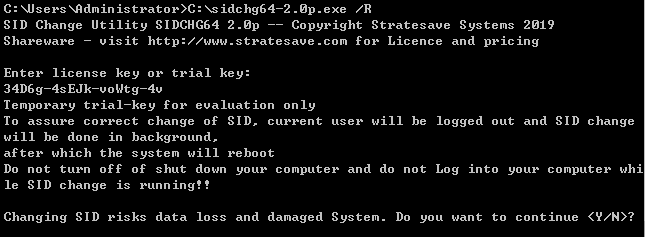
In the prompt box for modifying the SID, click Confirm to reset the SID.
During the reset process, the system will be restarted.After the startup is complete, right-click
Run, enter cmd, and press Enter to open the administrator command lineRun the following command to verify whether the SIDs have been modified.
whoami /user
