

Scenarios
This document takes the Windows Server 2012 operating system as an example to guide you on how to create Windows images.
Operation Steps
Preparations
When you export a system disk image, you need to check the following:
If you export via a data disk image, you can skip this operation.
Checking OS Partition and Starting Mode
On the operating system interface, click
 to open a Windows PowerShell window.
In the Windows PowerShell window, enter diskmgmt.msc, and press Enter to open Disk Management.
Right-click the disk to be checked > Attribute, and select the Volume tab to check the disk partition type.
Determine whether the disk partition type is GPT partition.
- Yes, since GPT partitions are not supported by service migration, submit a ticket for feedback.
- If it is not, proceed to the next step.
Open CMD as an administrator and execute the following command to verify whether the operating system is started in EFI mode.
bcdedit /enum {current}Take the following returned results as an example:
Windows Boot Loader Identifier {current} device partition=C: path \WINDOWS\system32\winload.exe description Windows 10 locale zh-CN inherit {bootloadersettings} recoverysequence {f9dbeba1-1935-11e8-88dd-ff37cca2625c} displaymessageoverride Recovery recoveryenabled Yes flightsigning Yes allowedinmemorysettings 0x15000075 osdevice partition=C: systemroot \WINDOWS resumeobject {1bcd0c6f-1935-11e8-8d3e-3464a915af28} nx OptIn bootmenupolicy Standard- If
pathparameter contains efi, the current operating system is started in EFI mode. - If
pathparameter does not contain efi, proceed to the next step.
- If
 to open a Windows PowerShell window.
Uninstalling Software
Uninstall drivers and software that may cause conflicts (including VMware tools, Xen tools, Virtualbox GuestAdditions, and some software that comes with its own underlying drivers).
Installing cloud-base
For installation details, see cloud-base Installation Document.
Checking or Installing Virtio Driver
- Open Control Panel > Programs and Features and search for Virtio in the search bar.
- If the returned result is as shown below, the Virtio driver has been installed.

- If the returned result is as shown below, the Virtio driver has been installed.
- If the Virtio driver is not installed, you need to install it manually.
- For Microsoft Windows Server 2008 R2 (Standard, Data Center, and Enterprise editions) and Microsoft Windows Server 2012 R2 (Standard edition), contact your engineer to obtain a customized Virtio version.
- For other system versions, download Community Edition of virtio.
Checking Other Hardware-related Configurations
Hardware changes after migration to the cloud include but may not be limited to:
- The graphics card is replaced with Cirrus VGA.
- The disk is replaced with Virtio Disk.
- The network interface is replaced with Virtio Nic, which is a local connection by default.
Exporting an Image
Select different tools to export images based on actual needs.
- Use platform tools to export image.
- Use disk2vhd to export image.
Using Platform Tools to Export Images
Use the export image tool of the virtualization platform such as VMWare vCenter Convert or Citrix XenConvert. For details, see the export tool documentation for each platform.
Currently, the image formats supported by Converge Cloud service migration are: qcow2, vhd, raw, and vmdk.
Using disk2vhd to Export Images
When you need to export the system on physical machines or do not want to use platform tools to export, you can use the disk2vhd tool to export.
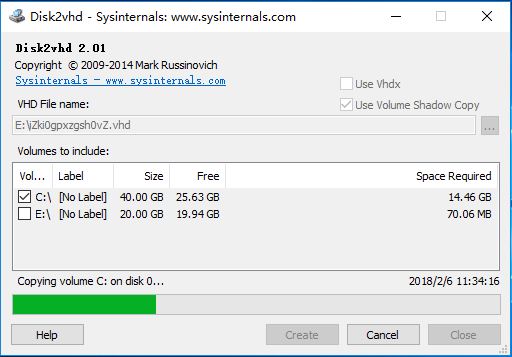
- Install and open the disk2vhd tool.
- Select the destination path for the exported image, check the volumes to be copied, and click Create.
Note:- The disk2vhd can run only after the VSS (Volume Shadow copy service) feature is preinstalled on Windows.
- Do not check Use Vhdx because the system currently does not support images in vhdx format.
- It is recommended to check Use volume Shadow Copy and use the volume shadow copy to better keep the data integrity.
Checking Images
If you create an image without stopping the service or for other reasons, the image file system may be incorrect. Therefore, it is recommended that you check whether the image is correct after creating it.
When the image format is consistent with the format supported by the current platform, you can directly open the image to check the file system. For example, the Windows platform can directly attach an image in vhd format, the Linux platform can use qemu-nbd to open an image in qcow2 format, and the Xen platform can directly enable a vhd file.
Take Linux platform as an example:
modprobe nbd
qemu-nbd -c /dev/nbd0 xxxx.qcow2
mount /dev/nbd0p1 /mnt
If the file system is damaged when the first partition of the qcow2 image is exported, an error will be reported during mount.
In addition, you can also start the Cloud Virtual Machine to test whether the image file can be used before uploading it.