

Overview
This section describes how to host an existing or new static website on COS. Visitors can access the managed static website by using the static website domain name provided by COS or a bound custom domain name (such as www.example.com). The following figure shows the detailed steps for hosting a static website on COS.
Note:
After enabling the static website configuration, you need to use the static website domain name to access the COS origin server for it to take effect. If you use the COS default domain name to access, there is no static website effect.
Preparation
The following are related services that may be used in the practice process:
- Domains (optional): Before hosting a static website, you need to have a domain, such as
www.example.com. If you are using a static website domain provided by COS, you do not need to use this service. - COS: A COS bucket is created to store the uploaded web page content.
- CDN: The CDN and DNS resolution services are used to bind the domain name to the website content, accelerate static website access, reduce the access delay, and improve the browsing experience.
- DNSPod: DNS resolution is used to ensure that a custom domain name is used to access the static website.
Note:
All steps in this guide use
www.example.comas an example domain. In actual operation, replace this domain with your domain.
Step 1: Domain Registration and Filing (Optional)
Domain registration is the basis for establishing any service on the Internet. After registering a domain, you need to file it before the website can be accessed normally. Proceed according to your specific situation:
- If the domain has been registered and filed, you can skip this step and proceed to Step 2.
- If the domain name is registered but not filed, proceed with Domain Name Filing.
- If the domain is not registered, first Register Domain Name and proceed with Domain Name Filing.
Note:
If you are using a static website domain provided by COS, you can skip this step.
Step 2: Create a Bucket and Upload Content
After completing domain registration and filing, you need to perform the following tasks in the COS console to create and configure website content:
- Creating a bucket
- Configure the bucket and upload content
1. Creating a Bucket
Use your account to log in to the COS console and create a corresponding bucket for your website. Buckets are used to store data. You can store website content in a bucket.
If you use COS for the first time, you can directly create a bucket by clicking Create Bucket on the overview page or Bucket List in the left navigation tree in the console. For detailed steps, see Create Bucket.
2. Configuring the Bucket and Uploading Content
Enable the Static Website setting for the bucket by:
Log in to the COS console. In the left-side menu bar, click Bucket List, find the created bucket, and click Configuration Management on the right.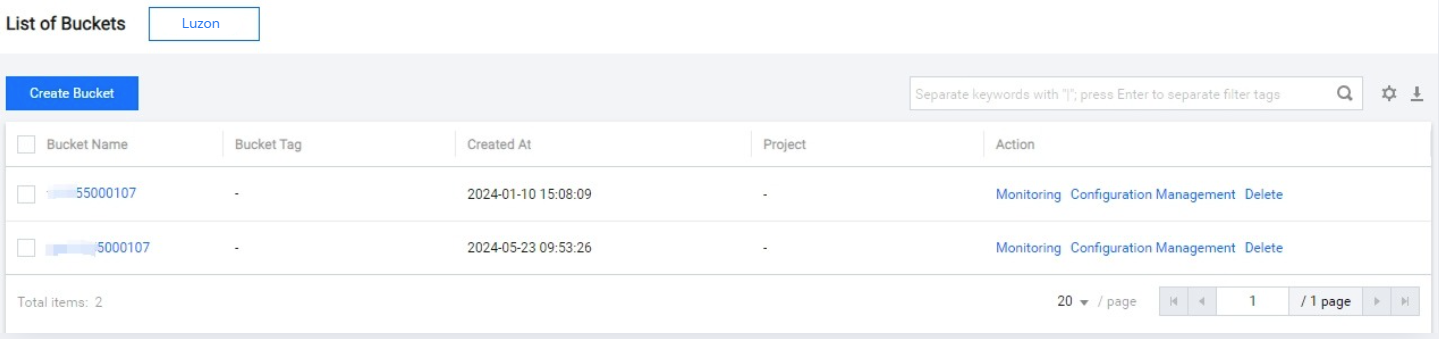
In the left-side menu bar, choose Basic Configuration > Static Website, click Modify, set the status to enabled, and set the index document to index.html. Leave the rest unconfigured, and click Save.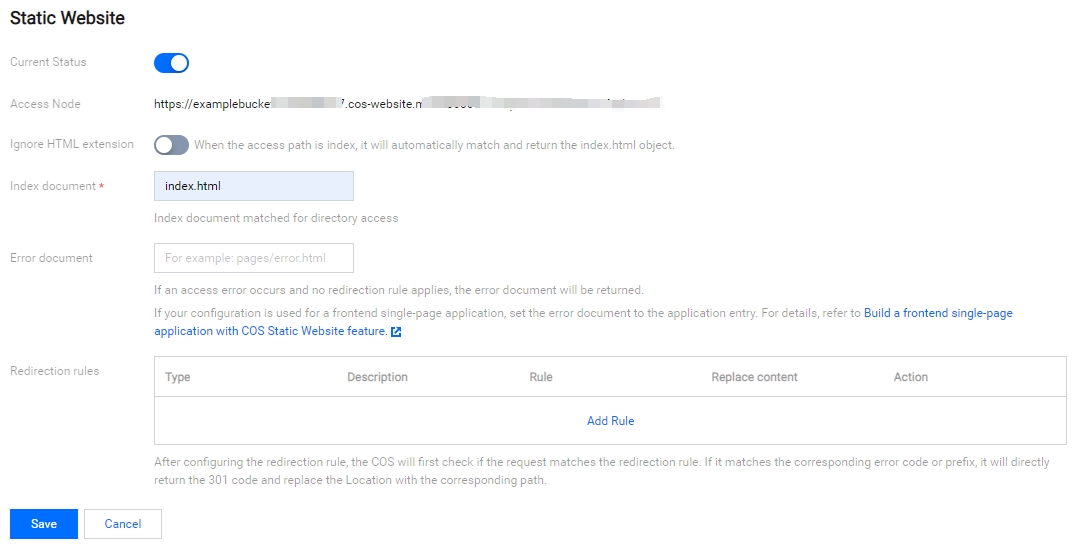
Upload your website content to the created bucket. For detailed steps, see Upload Object.
The content stored in the bucket can be text files, photos, videos, and anything you want to host. If you have not built a website yet, you only need to create one file according to this practice.
For example, you can use the following HTML to create a file and upload it to your bucket. In a later step, you will provide this file as the index documentation for your site.<!DOCTYPE html> <html> <head> <title>Hello COS!</title> <meta charset="utf-8"> </head> <body> <p>Welcome to use the static website feature of COS.</p> <p>This is the homepage!</p> </body> </html>Note:
After the static website feature is enabled, when a user accesses any first-level directory without a file pointer, COS will prioritize matching index.html in the corresponding bucket directory by default, followed by index.htm. If there is no such file, a 404 error is returned.
